June 2023
New Features
The following features are new in this release:
Out Of Cycle Review
The Response review process can be carried out based on the entry criteria set on the Approval Process created for the Response or Response Version object if the two conditions listed below are met:
Enable Out Of Cycle Review is set to true in Custom Metadata Types > Avnio RFx Configuration.
An active Salesforce Approval Process (Review Approval Process) should be available in your org.
For example:
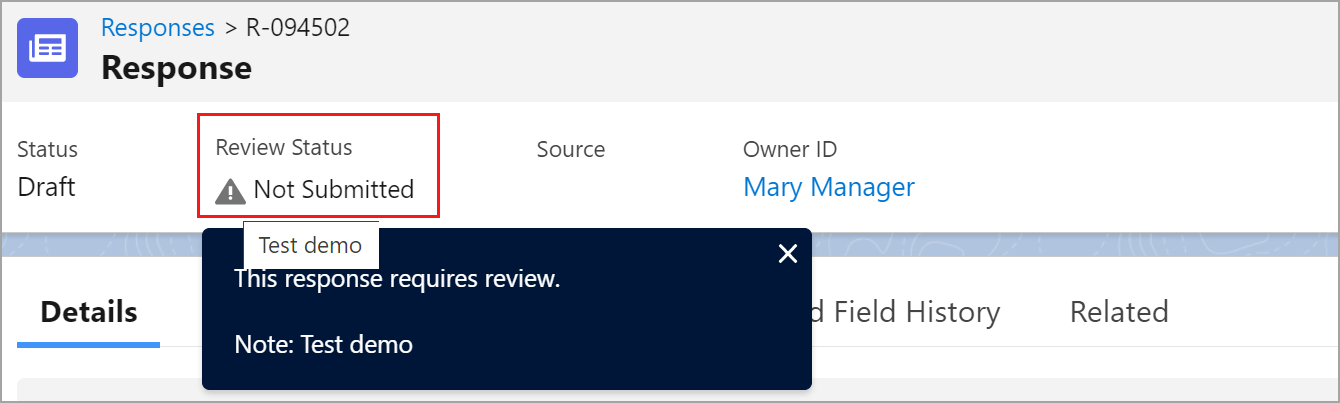
According to the entry criteria in the Approval Process, the Response Status should be other than Published or Archived (It can be Draft or Ready for Publish) and depending on the flow or trigger, the Review Status can be changed to Review Required (e.g. updating the Primary Answer) in the Response page as shown in the below GIF. After setting the above fields, the Response highlight panel will now display the Review Status as Review Required along with the information icon (shows the provided Review Reason values). The Submit For Review button will be visible on the right side header.
The Implementation team or System Admin is required to create a Flow or trigger to update Review Status to Review Required. Once the Review Status is updated to Review Required, the Submit For Review button will be visible.
If the updated fields in the Response record does not match the criteria in any of the Approval Process such as Help Text and Review Status, then the system will display an error message.
Click to enlarge
If you add the Review Status field from the Field Set, the field will always appear on the highlight panel.
If you did not add the Review Status field from the Field Set, you must configure the Enable Out of Cycle Review setting in Custom Metadata.
When you set the Enable Out of Cycle Review to false, the Review Status field on the highlight panel is hidden.
When you set the Enable Out of Cycle Review to true, the Review Status field appears on the highlight panel.
Click to enlarge
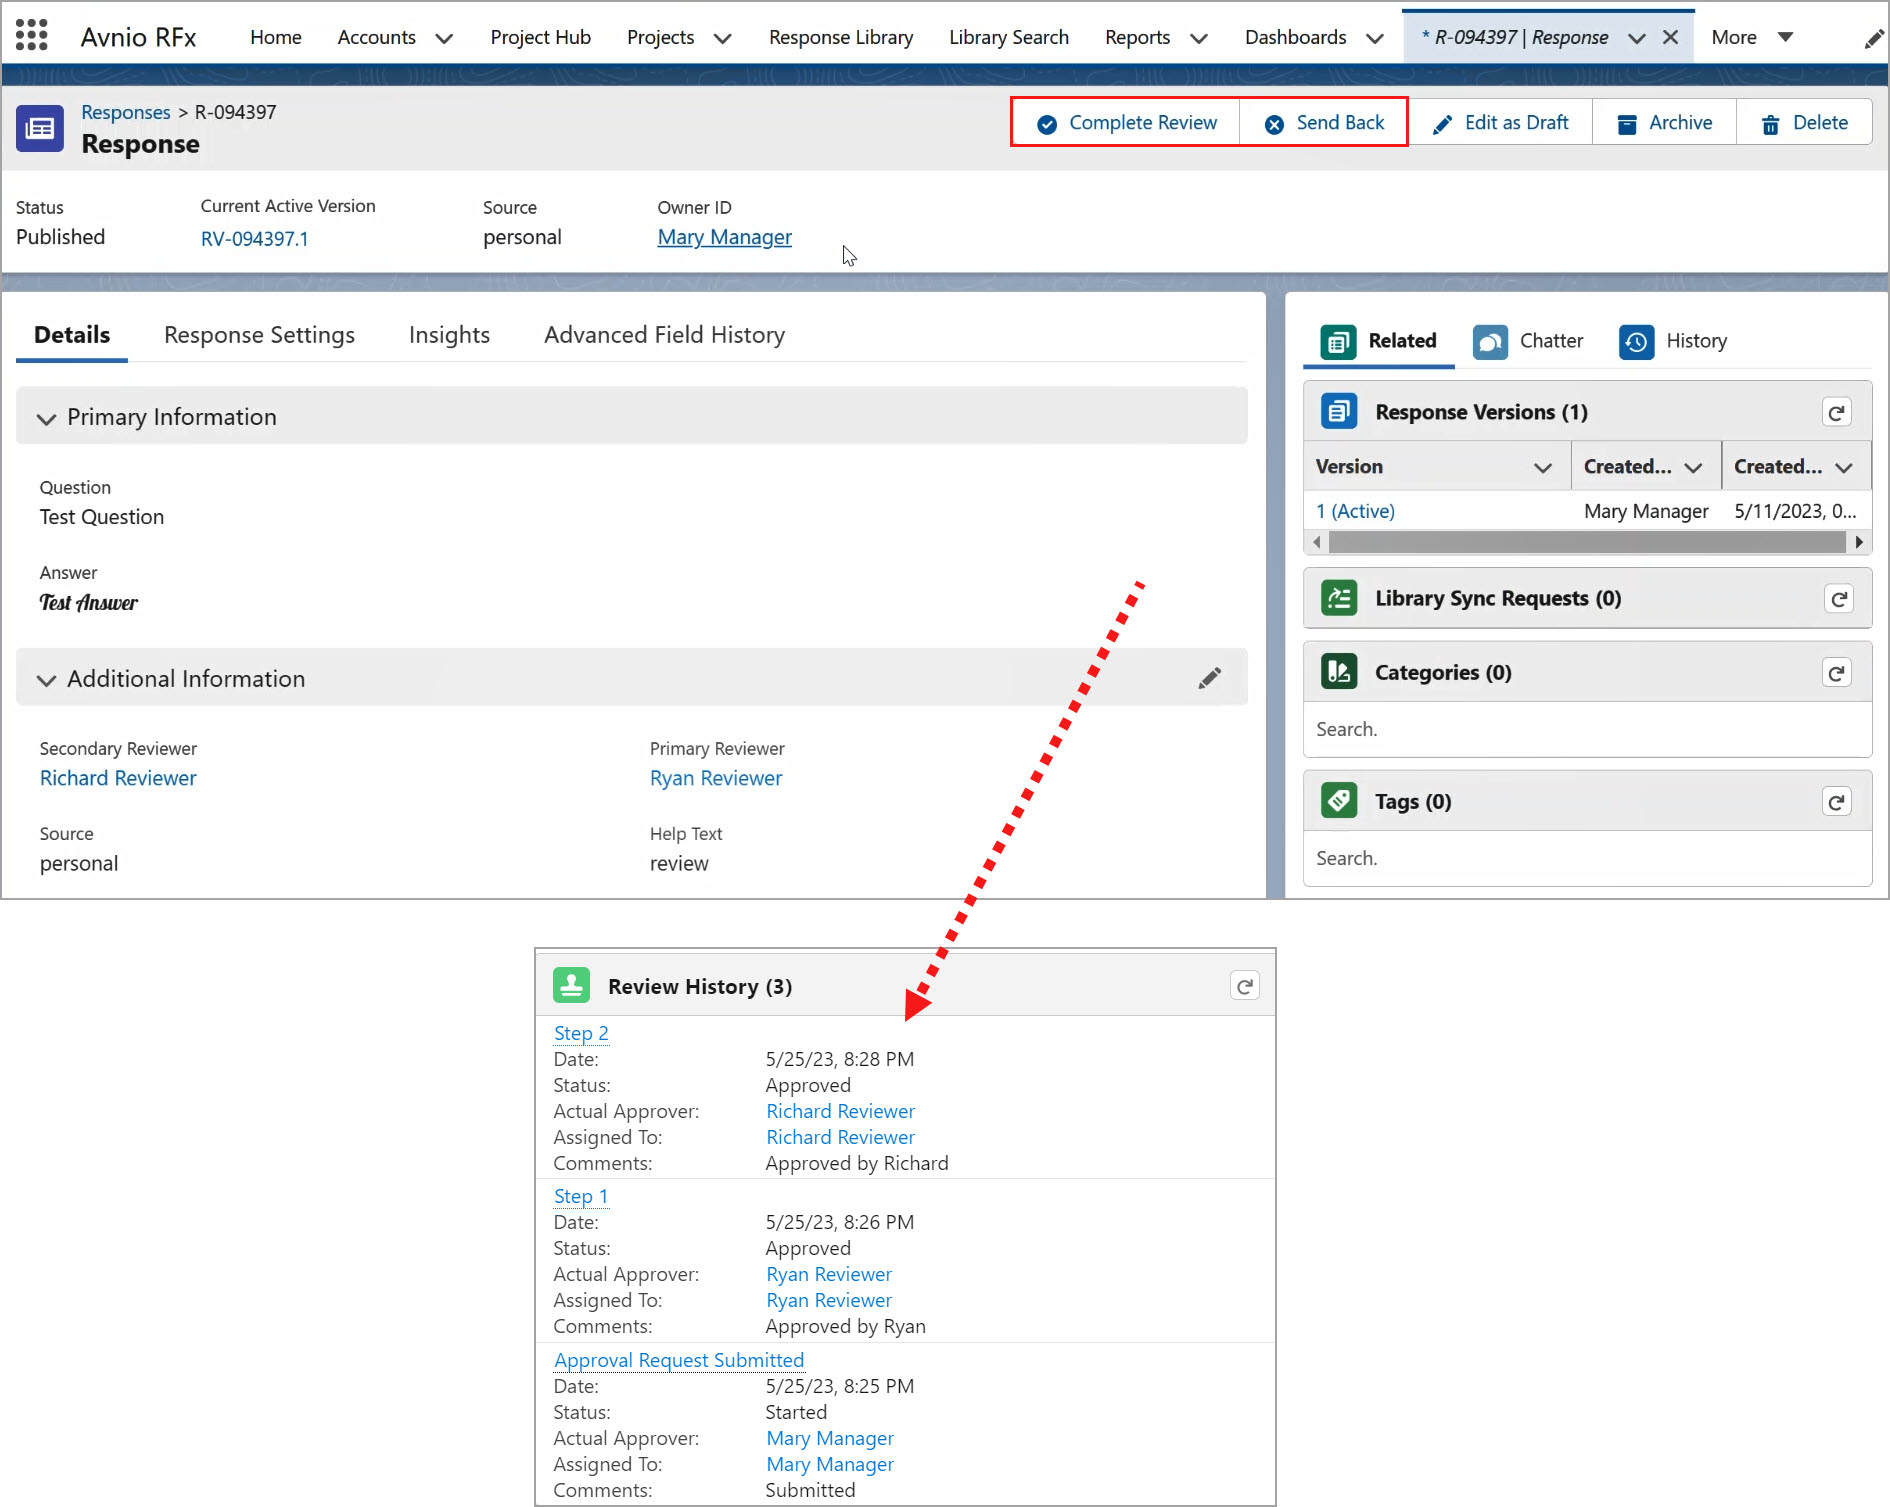
You can click on the Submit For Review button to submit the Response/Response Version for review and provide comments (optional) in the popup screen. The reviewers will receive a review notification so that they can Complete or Send Back the submitted request through the Complete Review and Send Back buttons appear on their respective login.
If reviewer Complete the request:
The Response Status on the Response will be updated as Completed.
The Status on the Response will be updated as Ready for Publish.
If reviewer Send Back the request:
The Response Status on the Response will be updated as Sent Back.
The Status on the Response will be updated as Draft.
Click to enlarge
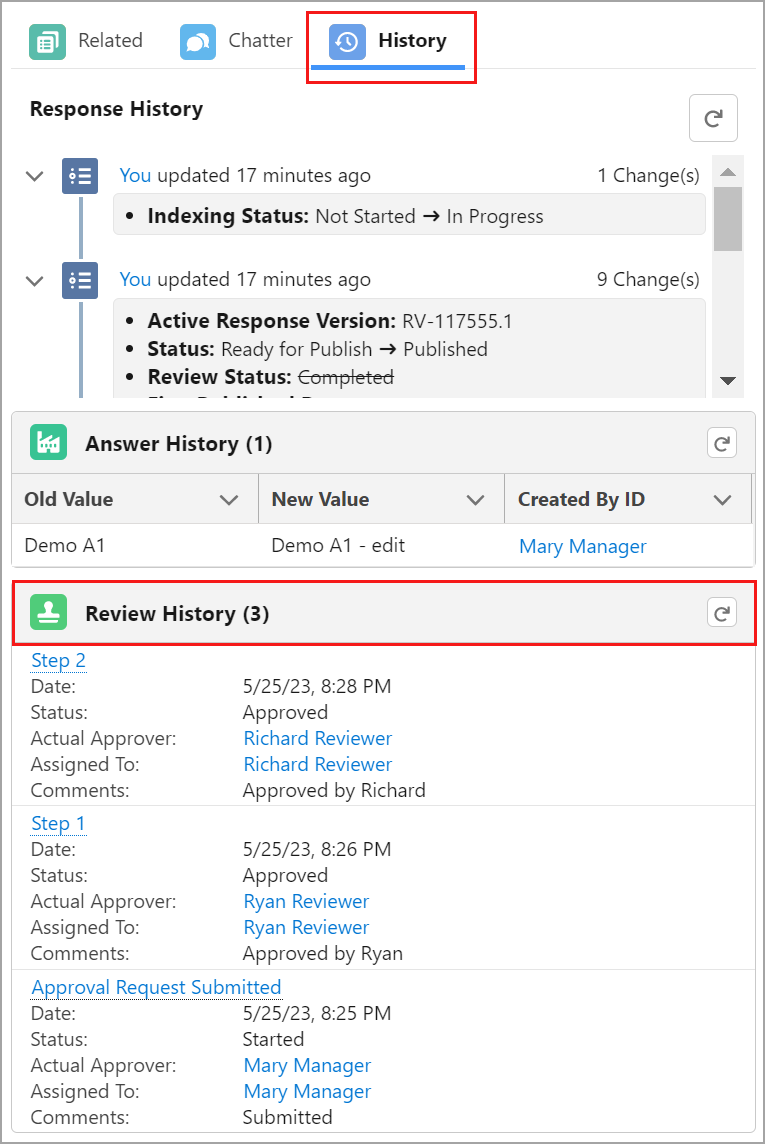
A new section named Review History is introduced to the History tab in the Response and Response Version page, which helps you to track the status of the request. This section only shows the review history, you can use the buttons available in the record header to take approval related actions.
Click to enlarge
Once the Response or Response Version is reviewed, you can publish the record by clicking the Publish button on the top right side.
Click to enlarge
The visibility of the Submit For Review, Complete Review and Send Back buttons will depend on the Status and Review Status fields, so you must update them accordingly in Approval Processes actions.
Submit Responses for Review Cycle
For a better user experience, introduced a new feature to automatically submit the eligible Response for the review cycle. This also helps to automatically track the Responses that are pending and submit them periodically for review cycle based on the business requirements.
The system can now directly submit the eligible Response record for the review cycle by setting the following:
You should have active Salesforce Approval Processes in your org.
You need to set the configuration Auto Submit For Review Cycle to true in Custom Metadata Types and/or Response record.
You can have one batch job (ResponseReviewCycleSchedule) runs behind the application, which will scan all the Responses that are due for the review cycle.
System admin can schedule above batch using ResponseReviewCycleSchedule Apex class. The frequency of this batch depends on the customer requirement (Avnio suggests to keep the batch frequency = Daily).
The Admin can set the batch using below steps:
Go to Setup > search and select Apex Classes > Schedule Apex > Edit and Save the new job.
Batch Job will consider the Responses based on the below criteria:
If the Response is already in the review cycle or the Marked for Cycle Review flag is enabled, the batch job will ignore the response.
If the Response is not eligible or not due for the review cycle, the batch job will ignore the response.
If the Response is eligible for a review cycle, you can follow the below example scenario.
Example:
These are the eligibility criteria fields mentioned in the below scenario:
Status = Published
Review Status should be other than Submitted (or) In Progress
Next Review Date = Today’s Date
When the Auto Submit For Review Cycle is set to true on the Response record, the Response is Eligible for the review cycle when the Batch Job gets triggered,
If the Auto Submit For Review Cycle is set to true on the Response record, the system will automatically submit the response for the review cycle and display two new buttons as shown below:
Complete Review
Send Back
Click to enlarge
If the Auto Submit For Review Cycle is set to false on the Response record, the system will auto-mark the Marked for Cycle Review field to true on the Response record that indicates the Response is due for the review cycle. Now, you can manually decide and choose an option from the below buttons:
Submit For Review
Cancel Review
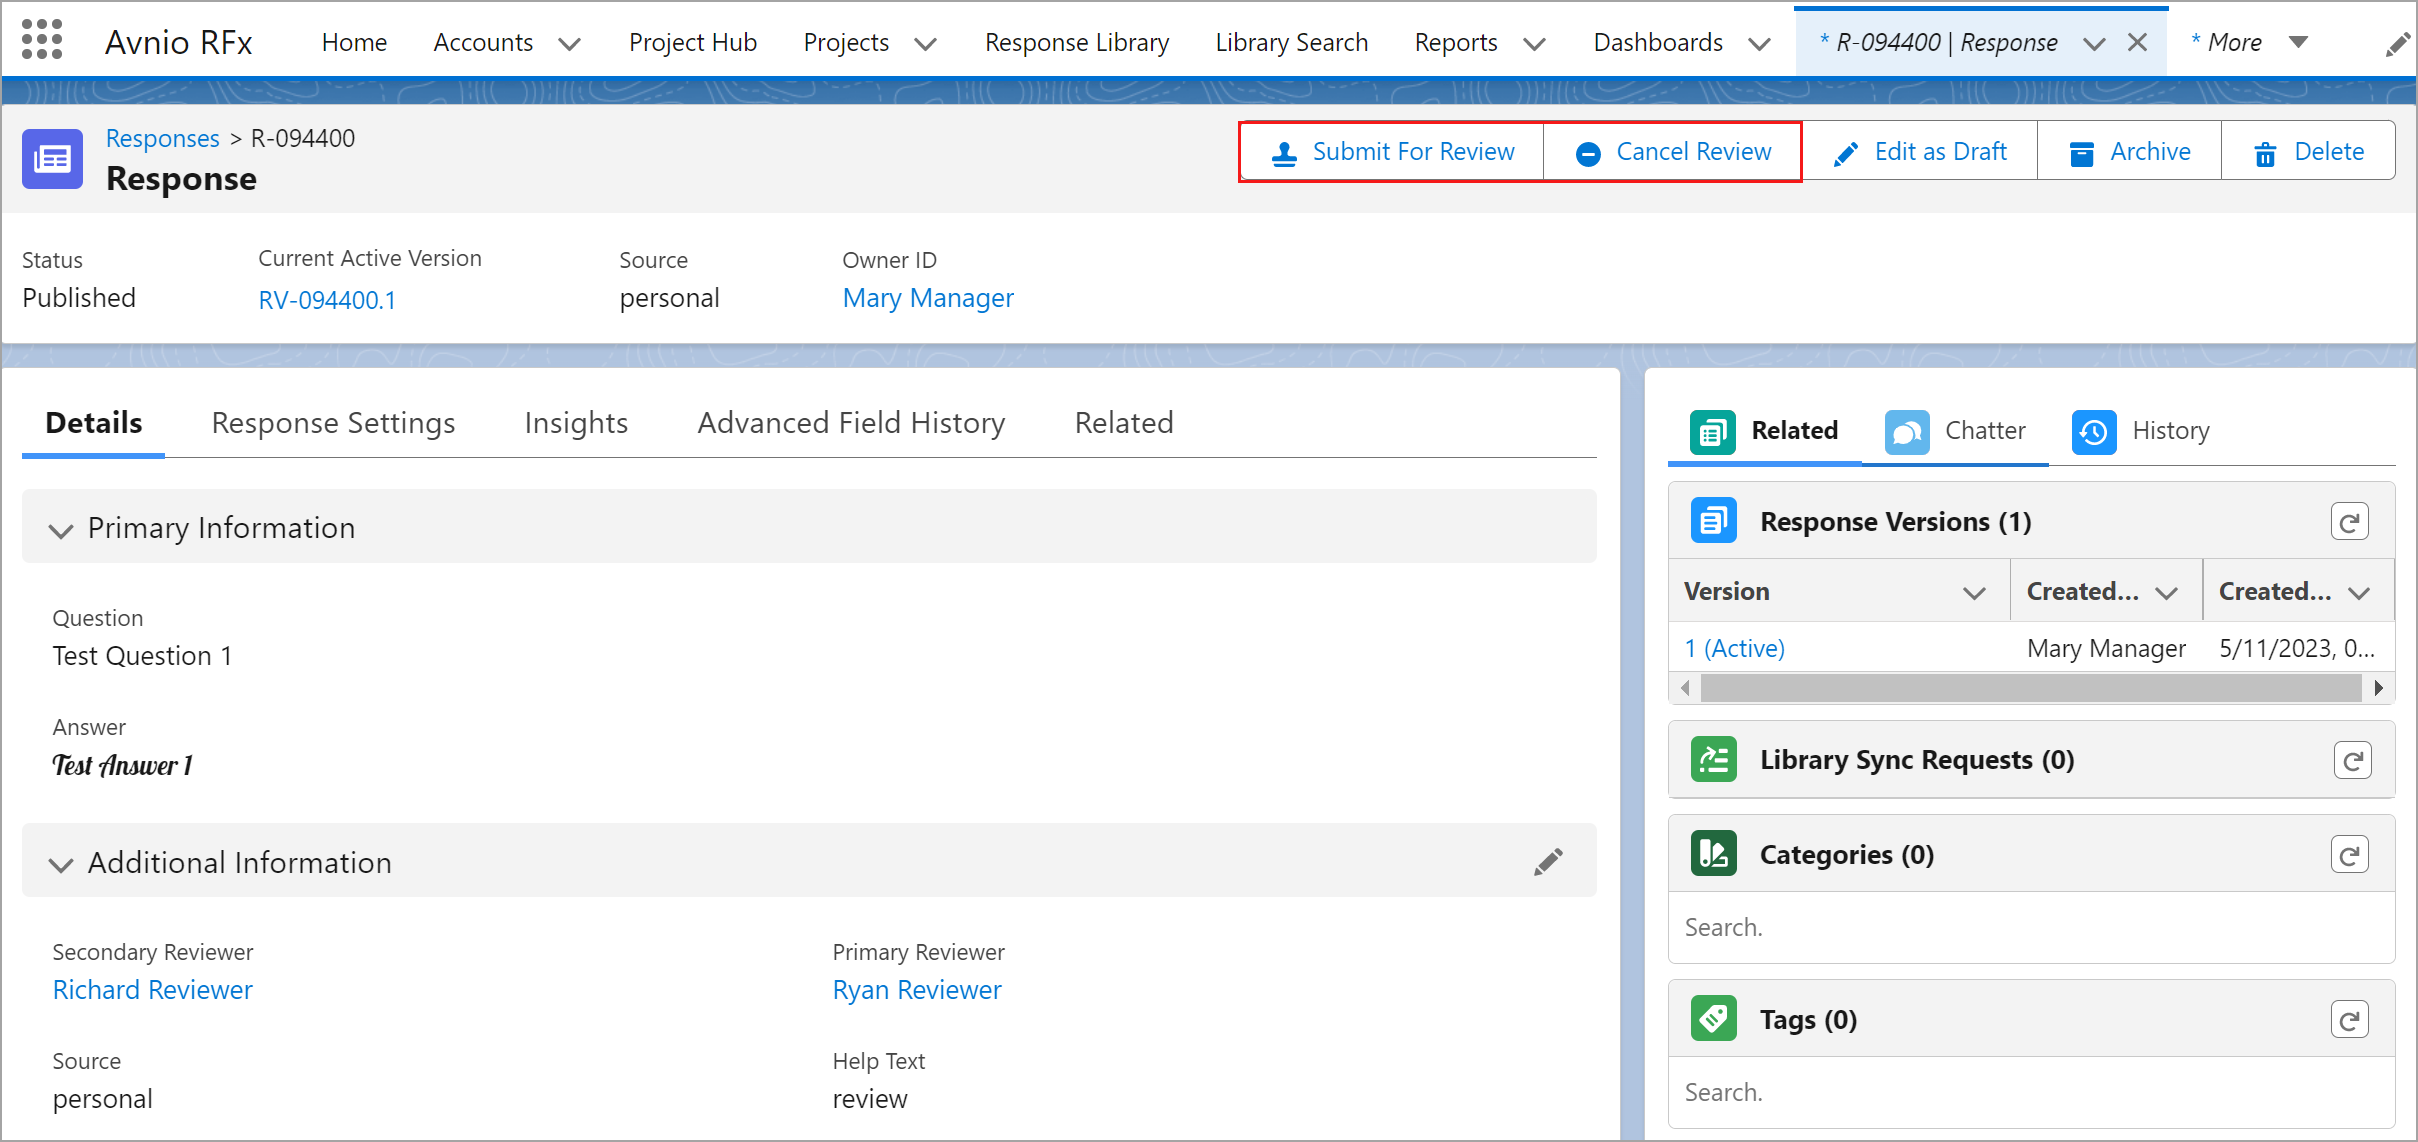
Click to enlarge
Submit For Review
Click to enlarge
Cancel Review
Click to enlarge
Avnio recommends you to update the Next Review Date field either on submitting the request or once the request is completed/sent back based on your requirement in Approval Processes. You should update this field on Cancel Review action as well.
The visibility of Complete Review, Submit For Review, Send Back and Cancel Review buttons depend on Status and Review Status fields, so you must update them accordingly in Approval Processes actions.
You can add the existing Out of the Box Actions available in RFx Package while creating the Approval Processes.
A new object Review Cycle History is introduced to track the history by creating a Review Cycle History record(with the information mentioned in the following table) for each Response record that is eligible for the review cycle.
Field Label | Description |
|---|---|
Response | Displays the ID of the specific Response record. |
Auto Submit For Review Cycle | Displays the status of the Auto Submit field checkbox whether it is checked or not at the time of record creation. |
Review Cycle Start Date | Displays the created Date and Time of the Review Cycle History record. |
Review Start Date | Displays the Date and Time of the record submitted for Salesforce Approval Processes. |
Review Started By | Displays the name of the user who submitted the record for Salesforce Approval Processes. |
Review Cancelled Date | Displays the Date and Time of the record when it is cancelled or Cancel Review button is clicked. |
Review Cancelled By | Displays the name of the user who cancelled the review record. |
Comments | Displays the notes captured by the user during the cancel review. |
Click to enlarge
Reviewers should consider the following points when the Review process is already in progress,
If there are no changes to be made during the Review, Reviewers can go ahead and complete the Review request.
If Reviewers need to make changes to the Response during the Review cycle, they have two options to follow:
Reviewers can create a Draft Response Version from the already Published Response, make changes to the draft version and then, publish it. After publishing, they can complete the review request by clicking the Complete Review button from the header panel.
(Note: Reviewers with the Custom Publish permission can only see the Publish button on the Response Version.)
Click to enlarge
To notify the changes to owner, Reviewers can add the necessary changes on the Chatter as a Post(mentioning the Response owner), click the Send Back button from the header panel, add the necessary changes in the comments, and click the Send Back button available on the pop-up.
Click to enlarge
From the notification request, the owner can create a Draft Response Version, make the required changes to the draft version and then, publish it. After publishing, owner can submit the Response for review by clicking the Submit For Review button in the header panel. Now, the Reviewer can review the changes in the Response Version and click the Complete Review button to approve the review request.
Click to enlarge
During the above process, if the review has been setup on the draft response version, the Implementation team will take care whether to go through the review on the Response Version or not.
Custom Actions in Response Library
Using the below conditions, you can set the visibility of the buttons (Submit For Review, Complete Review, Send Back and Cancel Review) on the Response/ Response Version record page.
Submit For Review:
You can submit the record for review by clicking the Submit For Review button. If the Approval Process is not available for the specific response, it will not submit the record for review and shows an error message.
Response | Out of Cycle Review:
| Cycle Review:
|
Response Version |
| N/A |
Both Complete Review and Send Back:
You can approve the submitted review request by clicking on the Complete Review button. You can reject the submitted review request by clicking on the Send Back button.
Response | Out of Cycle Review:
| Cycle Review: N/A |
Response Version |
| N/A |
Cancel Review:
When you click this button, it will update the Marked For Cycle Review field to false and the Review Cycle History with Cancelled By, Cancelled Date and Comment fields.
Response | Out of Cycle Review: N/A | Cycle Review:
|
Response Version | N/A | N/A |
Custom Actions in List Views
For Review Cycle:
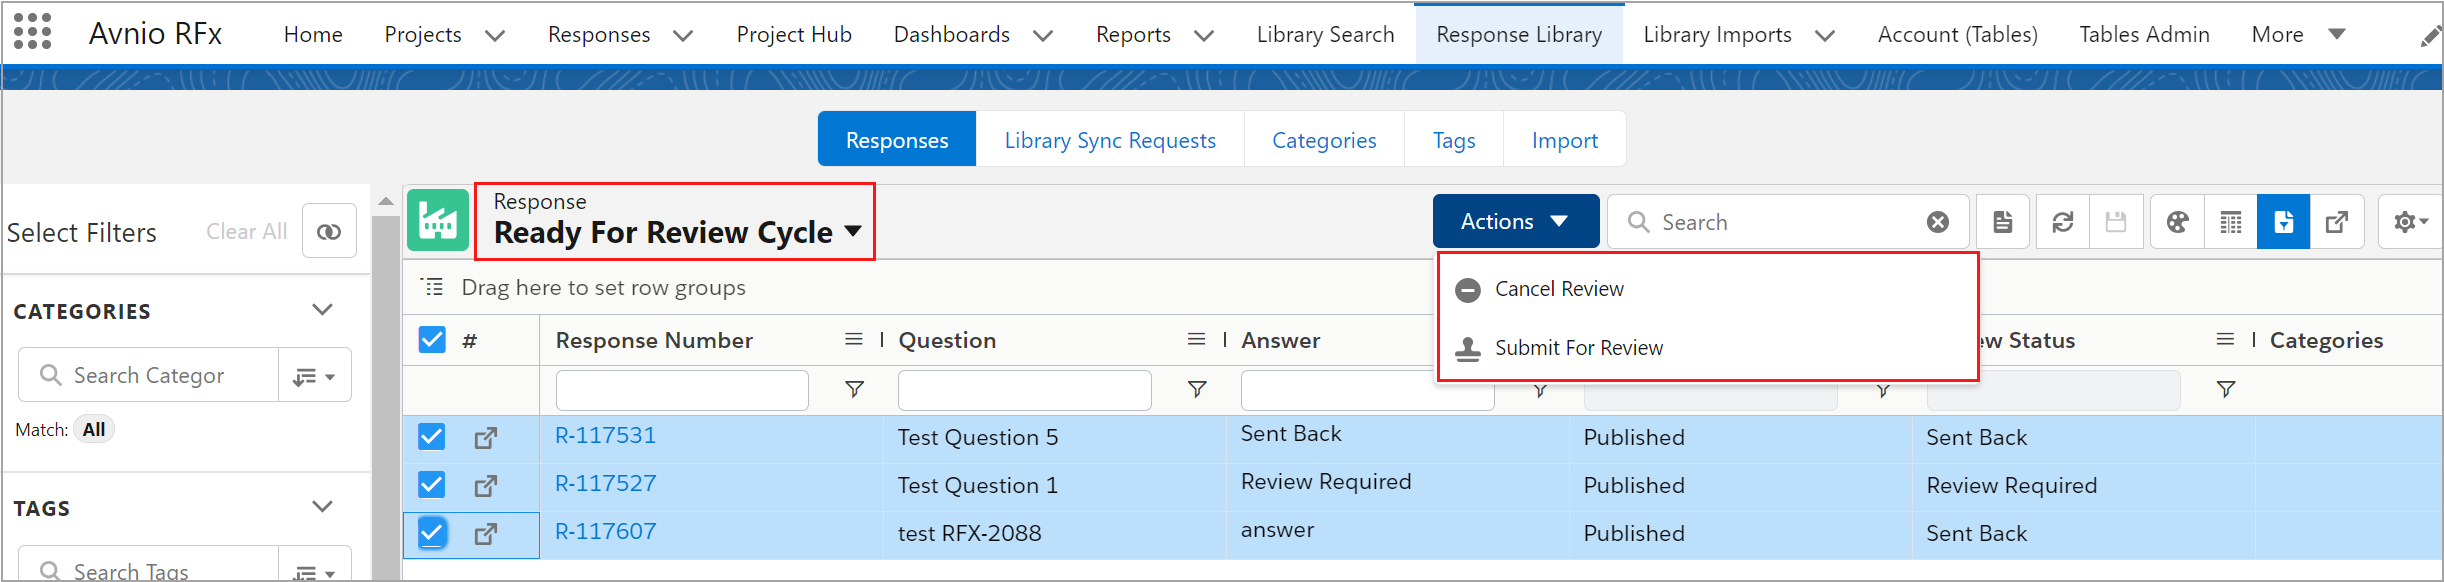
A new view for Review Cycle named Ready For Review Cycle is introduced in the Response Library tab to show all responses that have been marked for cycle review but have yet to be submitted or cancelled.
After selecting one or more Response(s) from the specific view, you can hover on the Actions dropdown to see the below options.
Submit For Review
Cancel Review
Click to enlarge
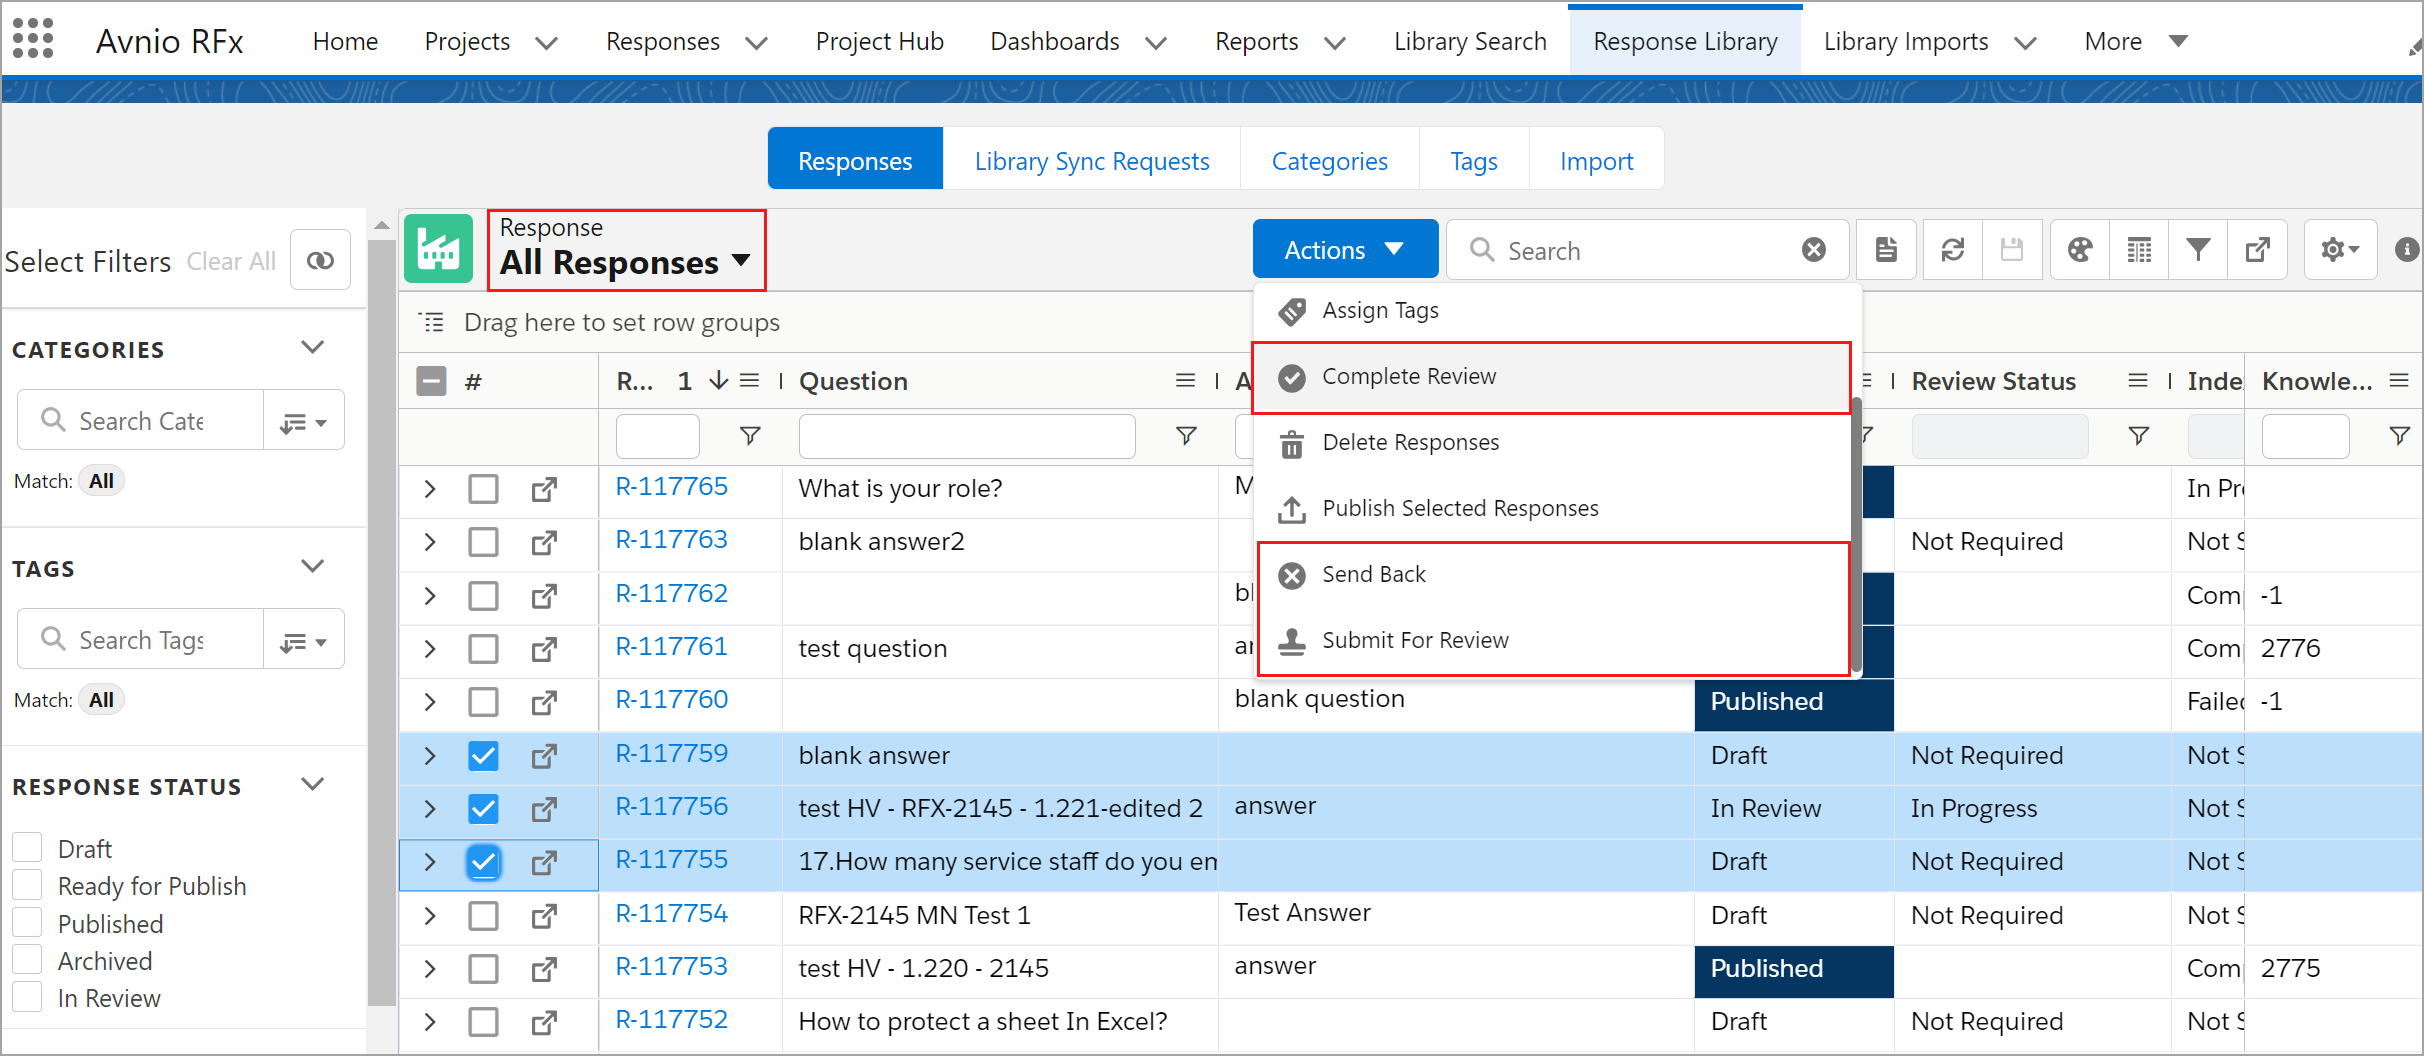
For Out of Cycle Review:
You can choose the All Responses list view, select one or more Response(s) and hover on the Actions dropdown to see the below options.
Submit For Review
Complete Review
Send Back
Click to enlarge
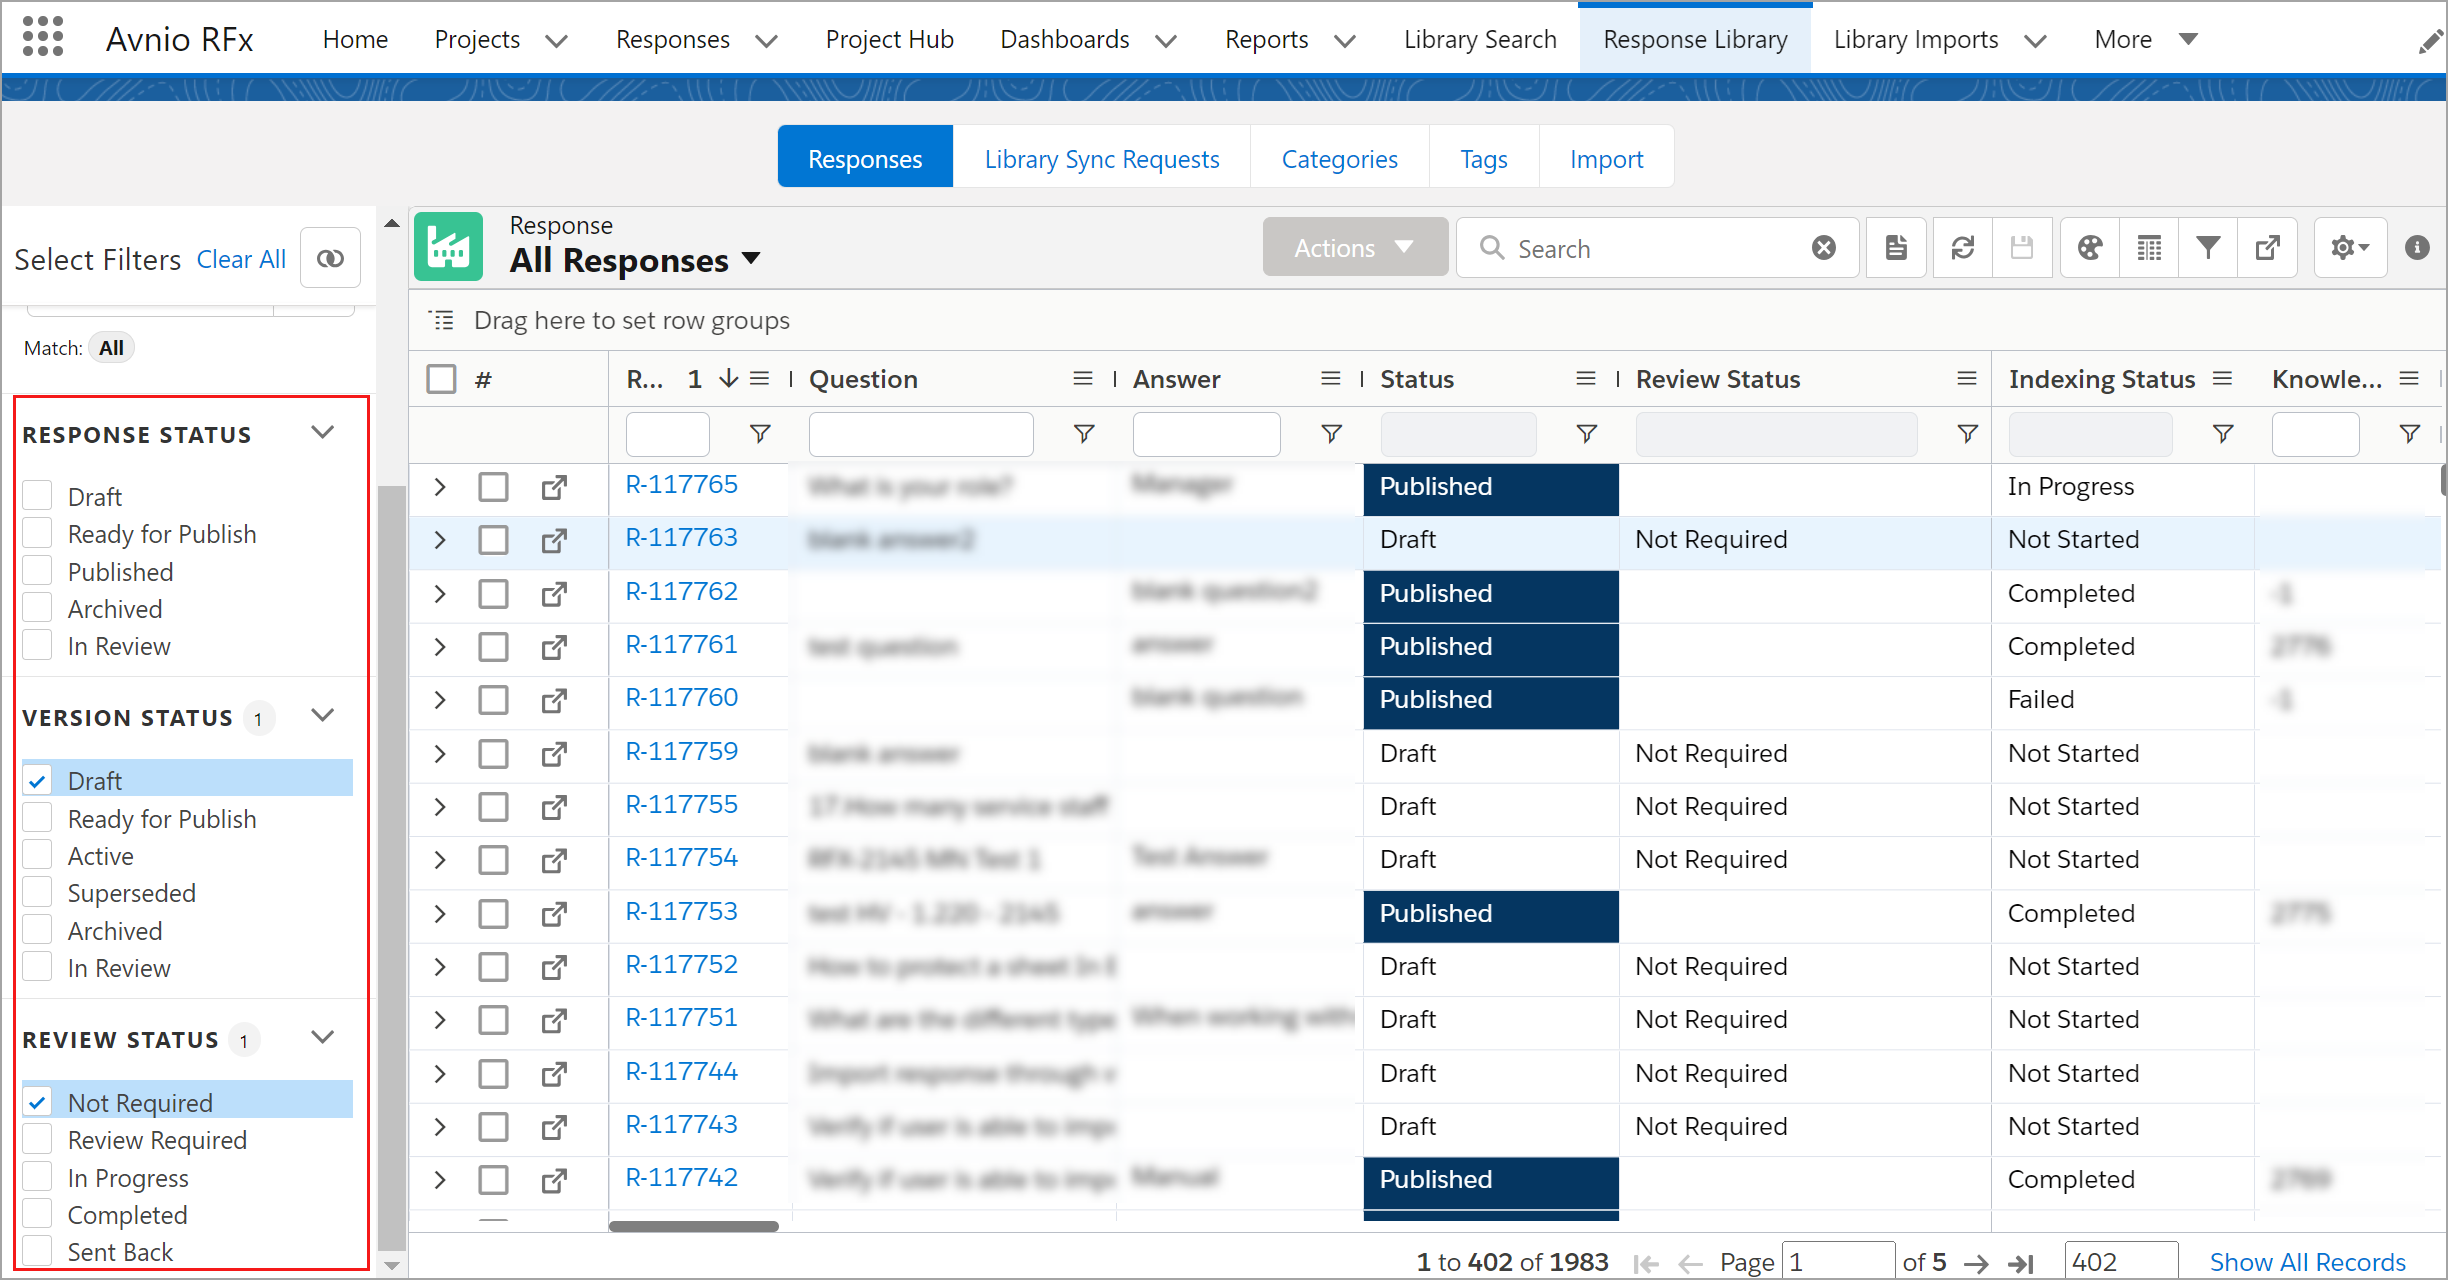
A new filter named Review Status is introduced to the sidebar of the Response Library > Responses tab similar to Response Status and Version Status filters, which helps you narrow down the list of responses to find the correct one or many.
The Review Status filter uses an OR condition with the Response Status and Version Status filters.
For example, if you select the Draft version in the Version Status filter and the Not Required option in the Review Status filter, you will see a list of responses that are Not Required (regardless of whether they have a Draft version) as well as responses (in In Progress, Completed and Sent Back status) that have a draft version.
Click to enlarge
Response Team Members
A Response Team is a group of individuals (Owners and Reviewers) who are working on the same response together, with shared goals and objectives.
Response Owner
Once a response is created, the Response Owner (the person who created it) is automatically added to the Response Team Member.
You can also add or remove another owner(s) by clicking the Response Team button available in the Response header.
At the header section of the Response and Response Version record, you can see all team member icons grouped by Owner role. You can also click the icon to add or remove another owner(s).
The Response Owner added to the parent response is visible in read-only mode on subsequent versions.
When you change the primary owner using the field in the Details tab (page layout), the Response Team is also updated.
You can not delete the primary owner of the response.

Click to enlarge
Response Reviewer
Enable Out Of Cycle Review configuration under Custom Metadata Types > Avnio RFx Configuration must be true to add the reviewer(s) as a Response Team Member using the Response Team button and primary and secondary reviewers fields available in the Details tab (page layout).
At the header section of the Response and Response Version record, you can see all team member icons grouped by Reviewer role. You can also use the icon to add or remove another reviewer.
When you add the reviewer using the Response Team button or team member icon, the first reviewer in order is added as a Primary Reviewer and the second in order is added as a Secondary Reviewer. The same reviewer is also added to the fields available in the Details tab (page layout).
Reviewers can only make changes to the Response Version's details if its status is Draft.
Reviewers can only make changes to the Response's details for all statuses other than In Review.
After publishing the Response, reviewers are copied from the Response to the Active Response Version.
After creating a draft version using the Edit as Draft button, reviewers are copied from the Response to the Draft Response Version.
When you change the primary and secondary reviewer using the field available in the Details tab (page layout), the Response Team is also updated.
You cannot change or delete the reviewer with whom the review is pending.
Currently, the system only supports two reviewers.

Click to enlarge
Users with all CRUD permission to the Response Team Members and Response Version Team Members objects can see the Response Team button and use team member icons and the Response Team button to add or remove additional owner(s) and reviewer(s). However, other users only with Read and View All permissions can only see the team member icons with the names of the owner and reviewer.
Custom Font in Avnio Editor
Custom Font can now be added to the Avnio Editor for usage with the View Questions functionality and the Response, Response Version, and Library Sync Request objects. You can enable the Font Selection option at Org level and also set the default font for the editor.
To use this functionality, the following fields are added to the custom settings RFx Project Configuration and RFx Response Configuration.
Custom Setting Name | Field Name |
|---|---|
RFx Project Configuration | Enable Fonts In Editor |
Custom Font Resource Names | |
Custom Font Names | |
Default Editor Font Name | |
RFx Response Configuration | Enable Fonts In Editor |
Before configuring the above-mentioned custom setting, you must upload a .zip file containing .css and fonts (listed in the .css file) files to Setup > Static Resources (the static resource name must be same as the .css file name).
Setup
Click to enlarge
Output
.gif?inst-v=2a047272-eed9-4a6f-9e0a-b49a2021ff40)
Click to enlarge
Browser Spell Checker in Avnio Editor
The spell checker that comes from the default browser can now be enabled to the Avnio Editor for usage with the View Questions functionality by clicking the Ctrl+Right Click (Windows) or Cmd+Right Click (macOS) on the misspelled word.
Click to enlarge
You can use this browser spell checker feature when the custom configuration Custom Metadata Types > Avnio RFx Spell Checker > Enable Spell Checker is disabled or set to False.
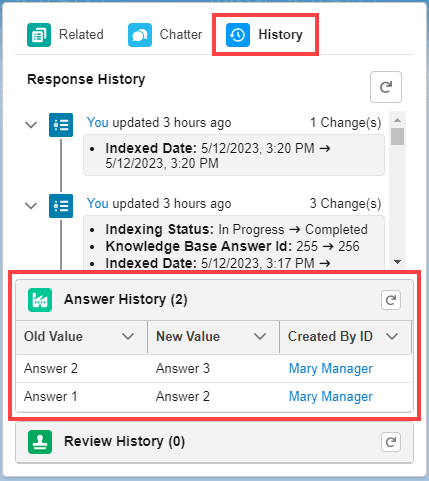
Answer History
The system now tracks Answer changes made to the Response, Response Version, and Library Sync Request records over time. You can view the change history of an answer with Old Value, New Value, and Created By ID.
Click to enlarge
Advanced Field History
The Administrator can now use the Advanced Field History component in Lightning Experience to track field history for the Response Version and Library Sync Request records. The Administrator can also set the columns and the tracking field while configuring this component.
Before placing and setting the Advanced Field History component, the Administrator must create a setting under Setup > Custom Metadata Types > Advanced Field History > Manage Advanced Field History Settings > New button.
For example, refer to the following steps to track the Avnio Response Question Version change history on the Response Version object:
Create a setting under the Custom Metadata Types > Advanced Field History Settings.
Open the Response Version record.
Click the Gear icon at the top right side of the screen > click the Edit Page option.
Drag and drop the Advanced Field History component to the page.
Select the component and add the section with the required fields.
Click Save.
Now you can see the field history of the specified field(s).
Click to enlarge
Record Delete History
A new object named Record Delete History is introduced to track the delete history of the Responses, Categories and Tags.
If you delete a Response, the system removes the main Response as well as related Response Versions; however, it creates an entry (Response Deleted) in the Record Delete History object only for the Response.
If you delete a Category or Tag from the Response, the system creates a new entry (Response Category Deleted or Response Tag Deleted) in the Record Delete History object.
If you delete a Category or Tag from the Response Library > Categories/Tags tab, the system creates a number of new entries (Category Deleted or Tag Deleted) based on how many Responses are associated with the appropriate Category or Tag.
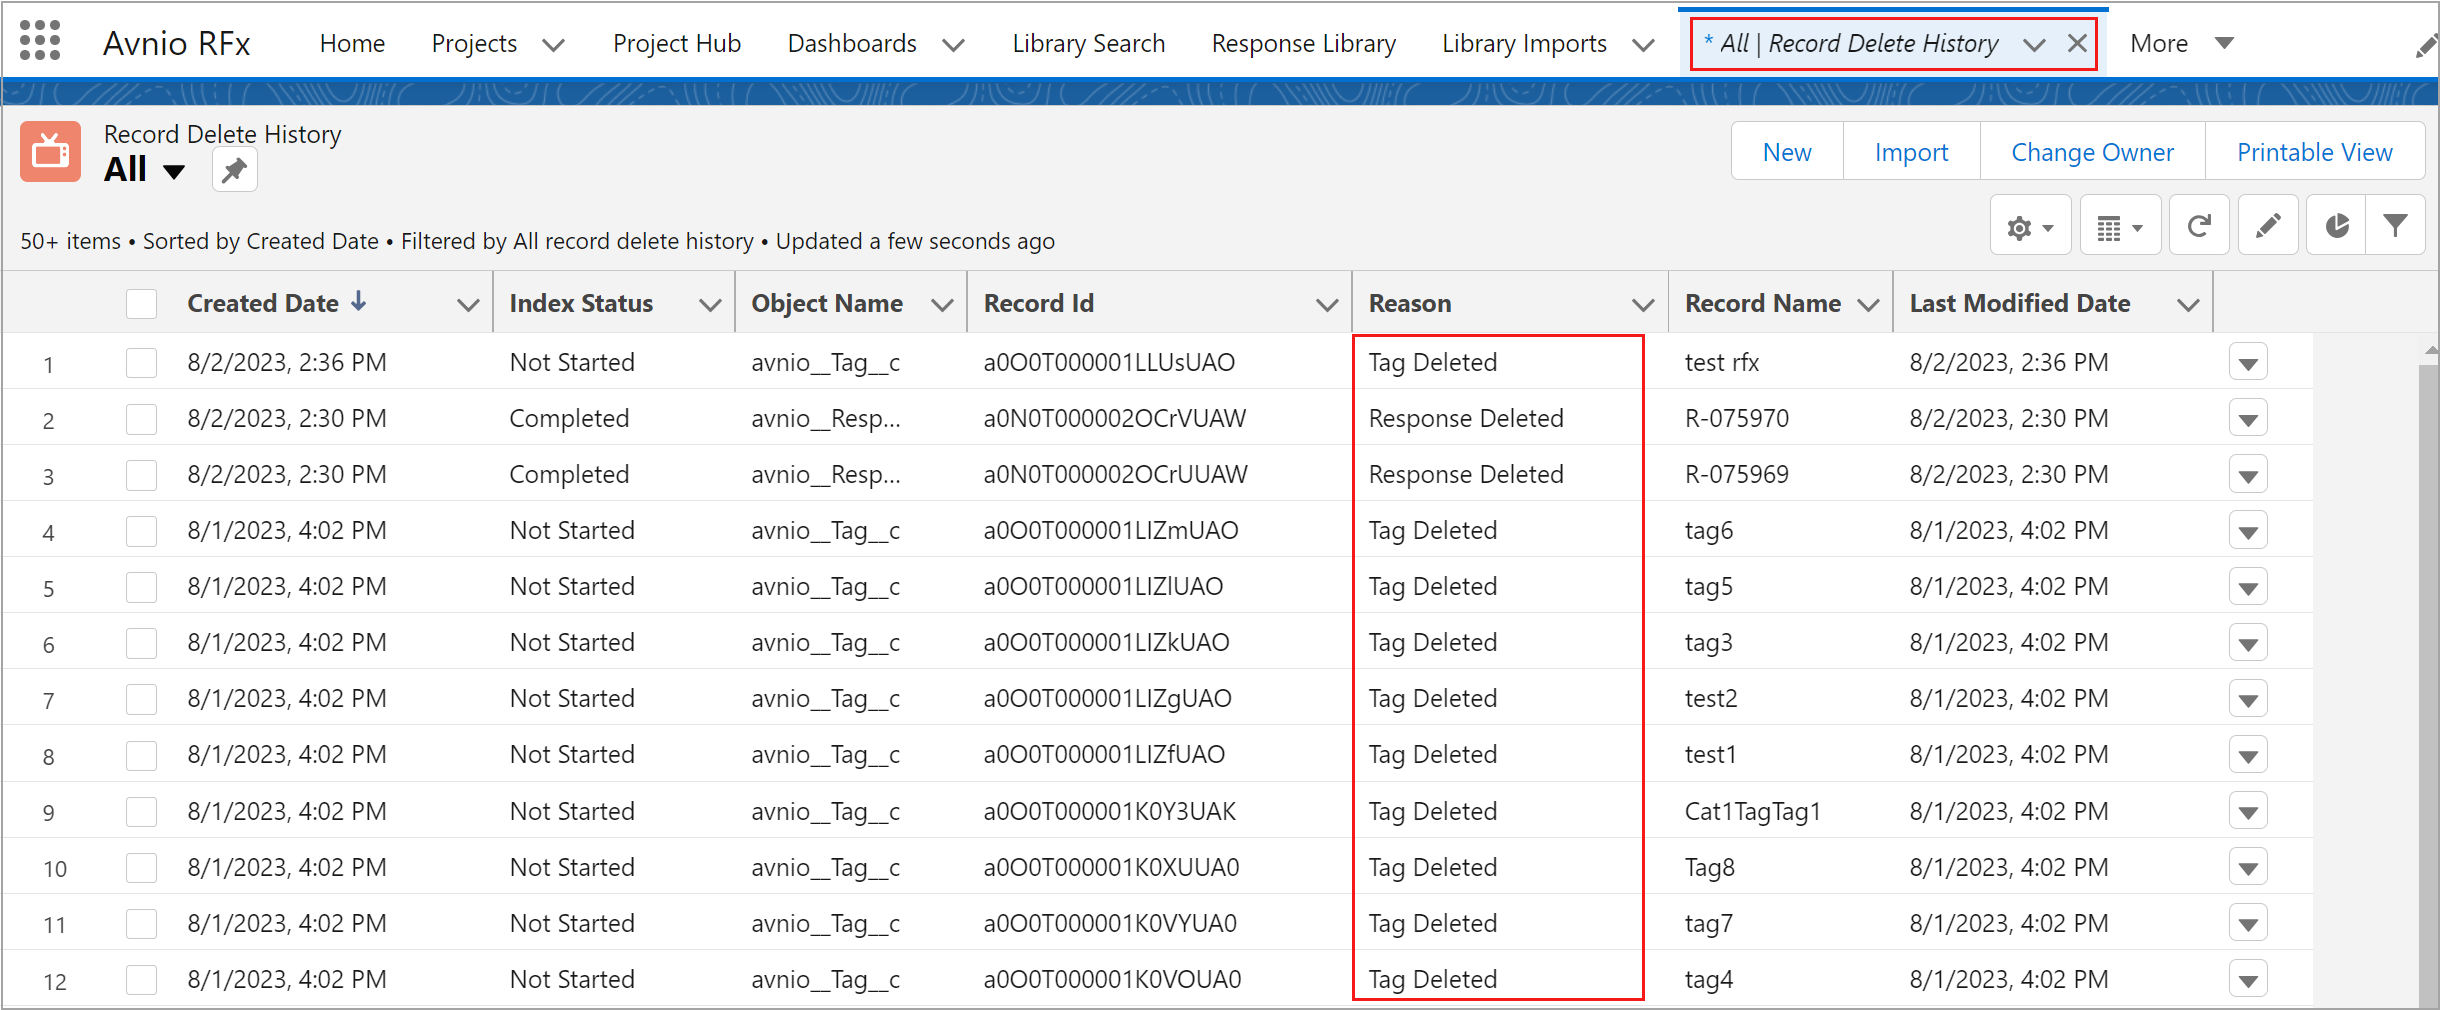
Click to enlarge
Refer to the following table to see the field label description for the Response and Category/Tag details:
Field Label | Response Details | Category/Tag Details |
|---|---|---|
Object Name | Response | Response Category or Response Tag |
Record ID | Displays the ID of the deleted record. | Displays the ID of the deleted record. |
Record Name | Response Name | Category or Tag Name |
Reason | Displays information about whether the Response or Response Version is deleted. | Displays information about whether the Category/Tag is removed from the associated Response or the Category/Tag record is deleted completely. |
Parent ID | This ID displays if any related record is deleted. The deleted record ID is stored as the Response ID and is used to identify the records that were deleted from the specific parent record. | This is a Response ID to which the Category/Tag is associated with. |
Details | Displays any extra information if required. | Displays any extra information if required. |

Click to enlarge
In Record Delete History, the Index Status updates from In Progress to Completed for a deleted Response and updates as Not Started for a deleted Category or Tag.
Enhancements
The following enhancements are new in this release:
Alternative Questions and Answers on the Response page
For a better user experience, updated the Manage Alternative Question and Manage Alternative Answer user interfaces. The user can now add more alternative questions and answers by clicking on the +Add Alternative Question Version or +Add Alternative Answer Version links.
You can use all the functionalities of the standard rich text editor, which allows you to include a variety of visual features while adding or editing an alternative answer.
You can add or update the Alternative Questions and Alternative Answers using Manage button when the Response or Response Version is in In Review Status.
Click to enlarge
Alternative Question and Answer in a single Library Sync Request
You can now submit a single Library Sync Request which includes both the request to add an Alternative Question and the request to add/update an Alternative Answer.
For this, you need to select the Question and Alternative Answer checkboxes and make changes to the question and alternative answer for the Library Sync Request.
Add New Alternative Question and Answer Request
Click to enlarge
Add New Alternative Question and Update Alternative Answer Request
.gif?inst-v=2a047272-eed9-4a6f-9e0a-b49a2021ff40)
Click to enlarge
Publish Responses
For a better user experience:
The Publish Reason label is renamed to Comments.
The application will now capture the Comments in the Library Sync Reason field of the Library Sync Request object.
Click to enlarge
Categories and Tags for Response
If the Validation Rule or Object/Field Level Restriction is applied, the system now shows an error message when the user tries to add or remove the Category and/or Tag from the Response record.
Validation Rule

Click to enlarge
Object/Field Level Restriction
Click to enlarge
Bulk Publish Responses
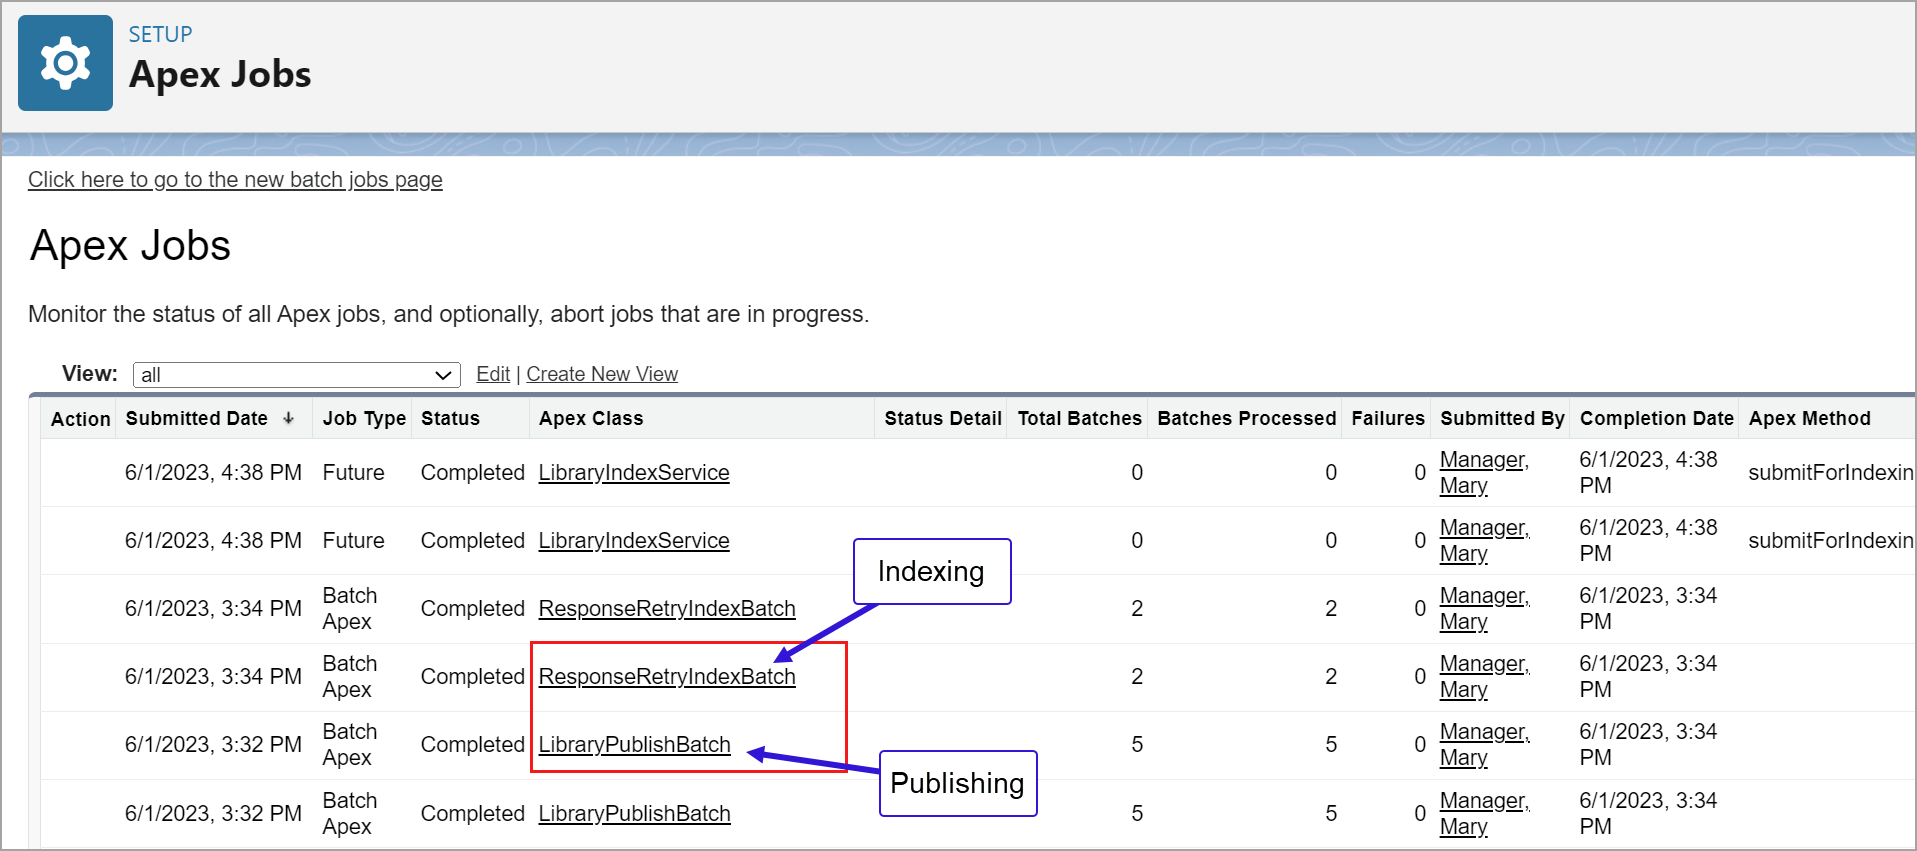
Improved the performance of publishing the responses in bulk using batch (LibraryPublishBatch) to overcome the slowness happened with large numbers of records. Once all of the responses have been published using batch, they will be submitted to indexing and can be done in a separate batch (ResponseRetryIndexBatch).
You can now parallelly publish the responses from two different systems, and it will be published simultaneously without any issues.
Additionally, enhanced the performance of deleting a large number of published responses in bulk with the combination of Alternative Question and Answer, Category and Tag.
Click to enlarge
The following are the Batch Names for publishing and indexing from Apex Jobs:
Publish : LibraryPublishBatch
Indexing: ResponseRetryIndexBatch
Retry Failed Response
Previously, due to an internal error or an inactive Cloud API while indexing, the Indexing Status of the published Responses was updated to Failed and captured the failure reason and the user had to publish them manually. Introduced a new Batch job (ResponseRetryIndexBatch) to automatically retry failed records in the next run and submit for indexing and publish them successfully.
System admin can schedule the batch using ResponseRetryIndexBatch Apex class. The frequency (hourly or daily) of this batch depends on the customer requirement.
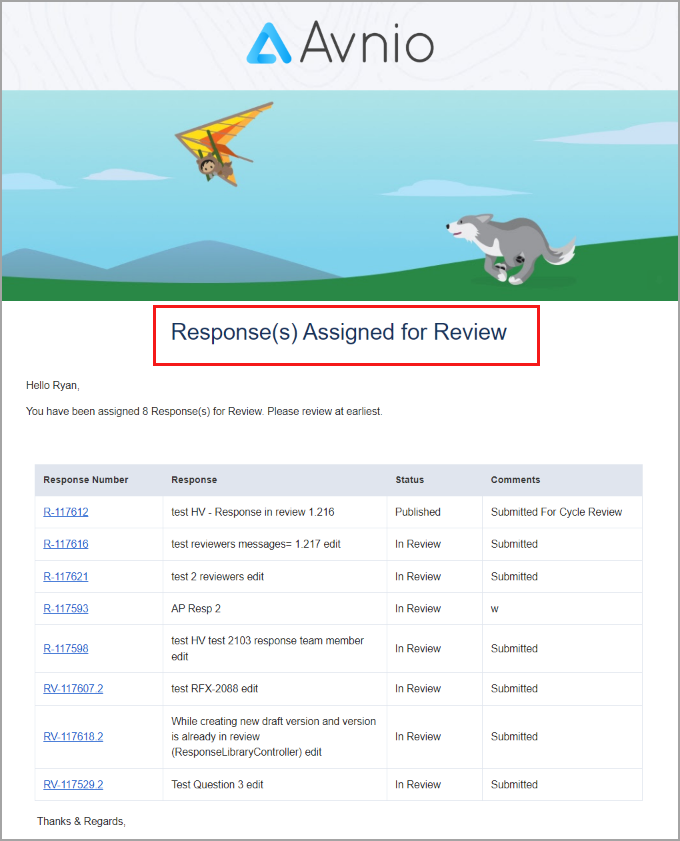
Combined Response Notifications
The Reviewer will now receive a single notification including all of the responses that have been submitted and are awaiting review.
Click to enlarge
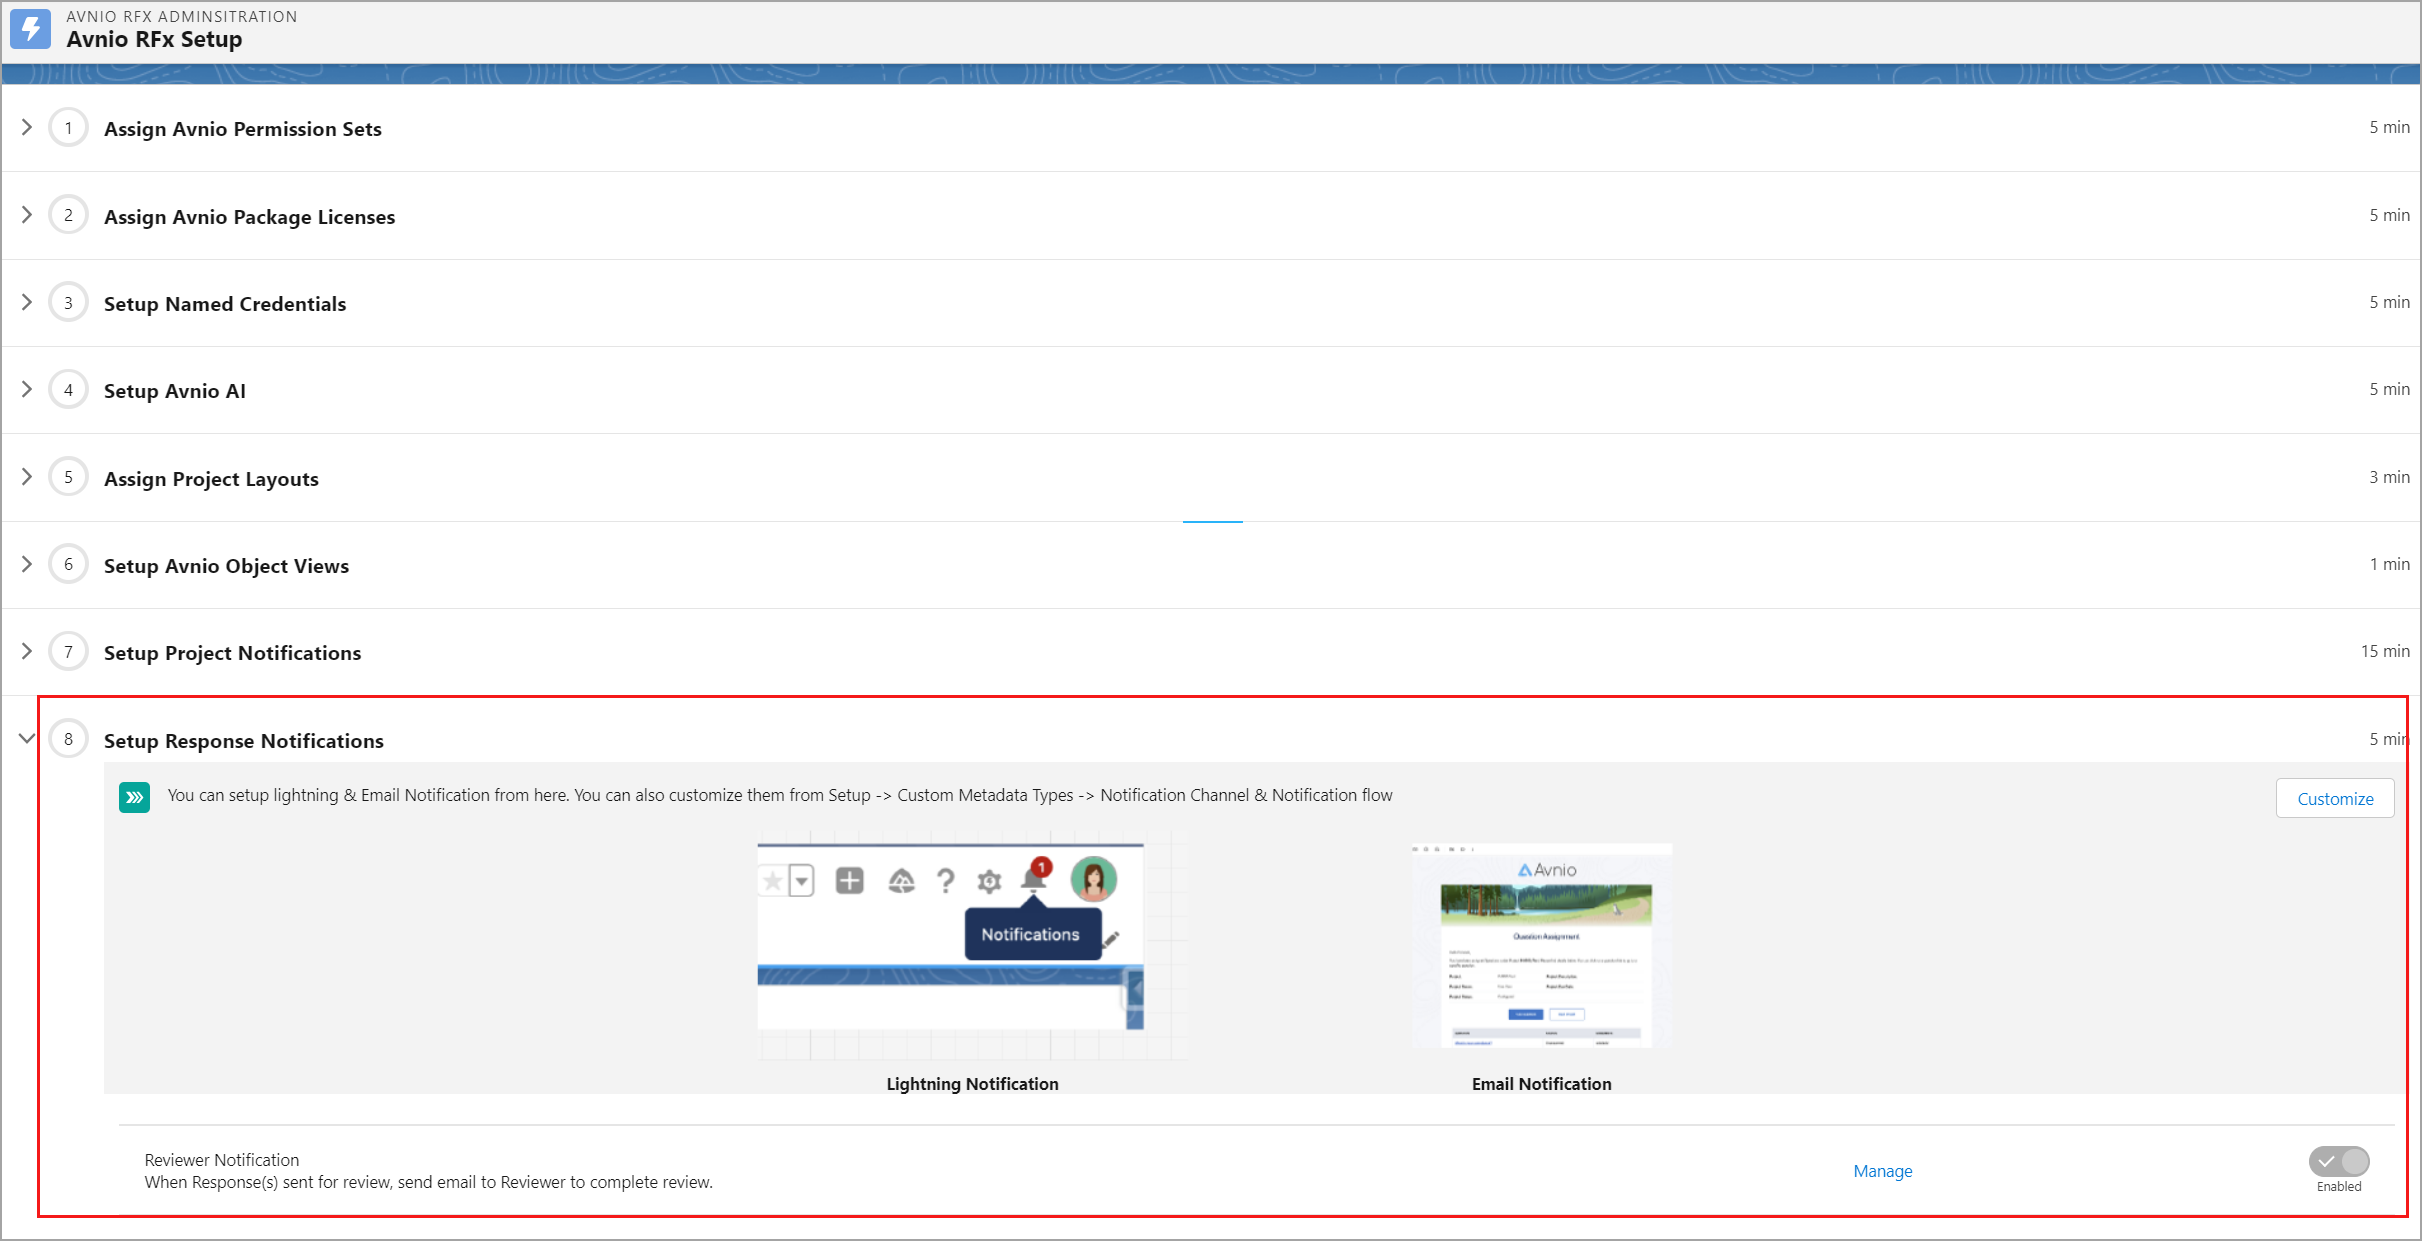
Enable Out Of Cycle Review configuration under Custom Metadata Types > Avnio RFx Configuration must be true to display the Setup Response Notifications option under Avnio RFx Setup.
In a two-step review process, if the first reviewer completes the review, then the response will go to the second reviewer for review and will get notified in the next batch run.
Click to enlarge
Only users with Admin permission can make changes to the frequency at the Apex Classes as per the business requirement.
Avnio does not allow to update the reviewers once the Response is submitted for review.
Configuring Word Document
You can now mark a table cell as an Answer field if there is no question cell in the same row. If you want to generate your answer in the same format as the table cell, select the table cell from the Avnio Editor and then enter your answer.
Click to enlarge
If you select the Use Plain Text option while configuring the Word document, the system will now also import the rich text content marked as answer as plain text.
Click to enlarge
Prefix for Number and Alphabet
The system will no longer import the following symbol prefix available with number and alphabet for each question and/or category when the user disables the Import prefix for Category and Import prefix for Question settings.
Number: ), }, ], :, -, ., #
Alphabet: ), .
Click to enlarge
User Activity
For a better user experience, the system will now also track the Origin and Channel information under the User Activity record > Details tab.
To access the User Activity record, Click the App Launcher icon > search and select User Activities.
Refer to the following table to see the input and output examples for different types of Origin and Channel:
Application/Request Initiated From | Origin | Channel | Output |
|---|---|---|---|
Salesforce - Library Search | Library Search Component | Salesforce | 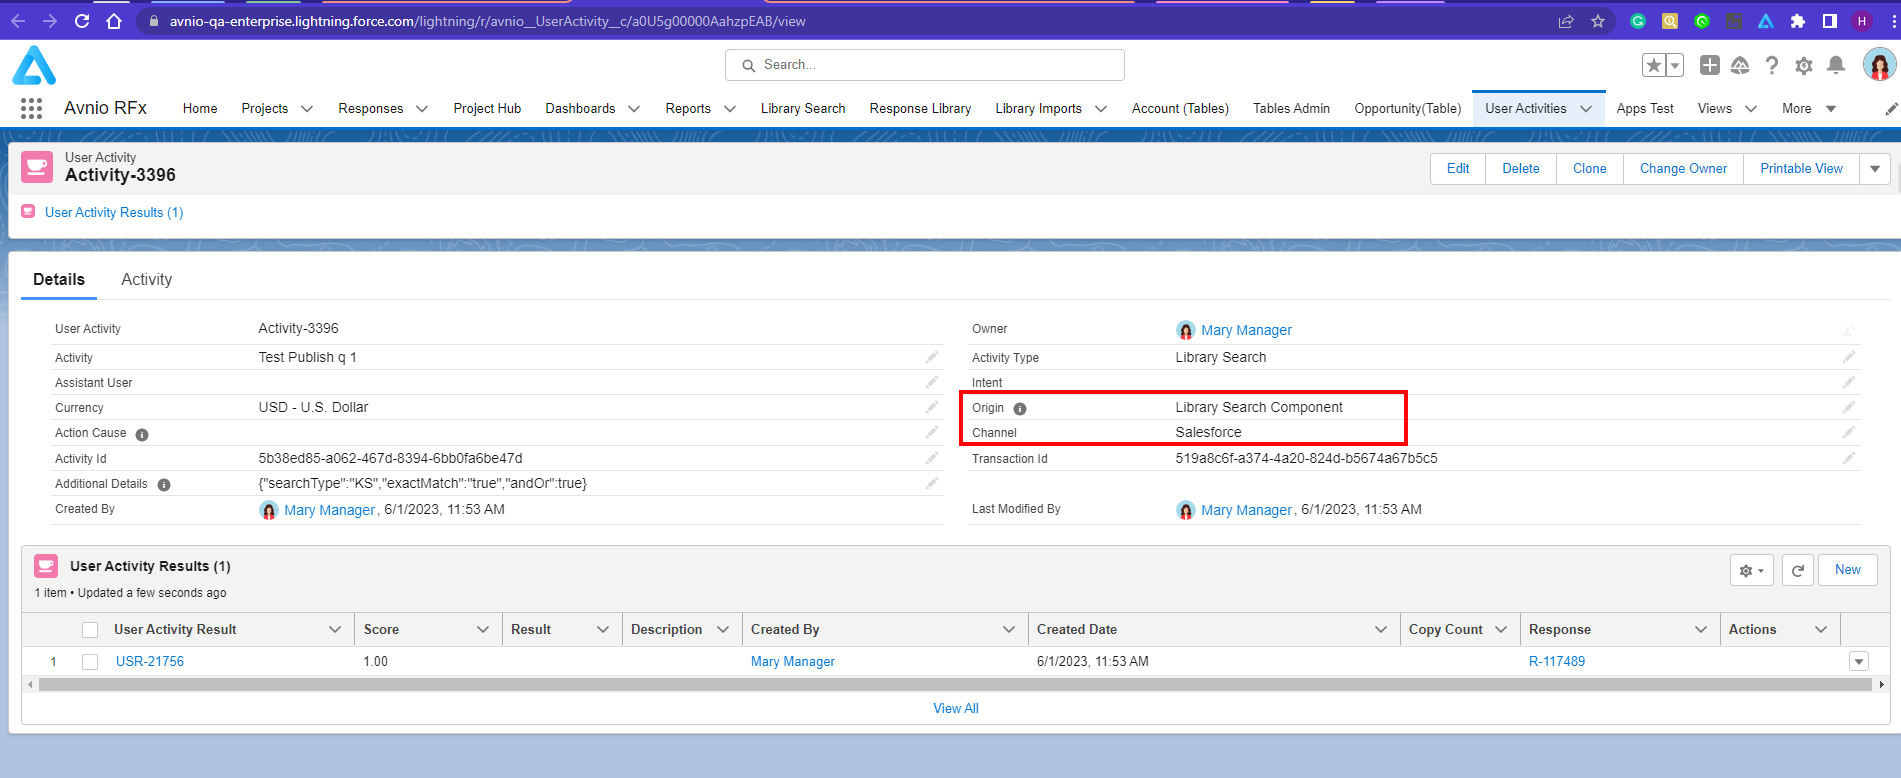 Click to enlarge |
Salesforce - View Question page Library Search | Library Search Project Component | Salesforce | 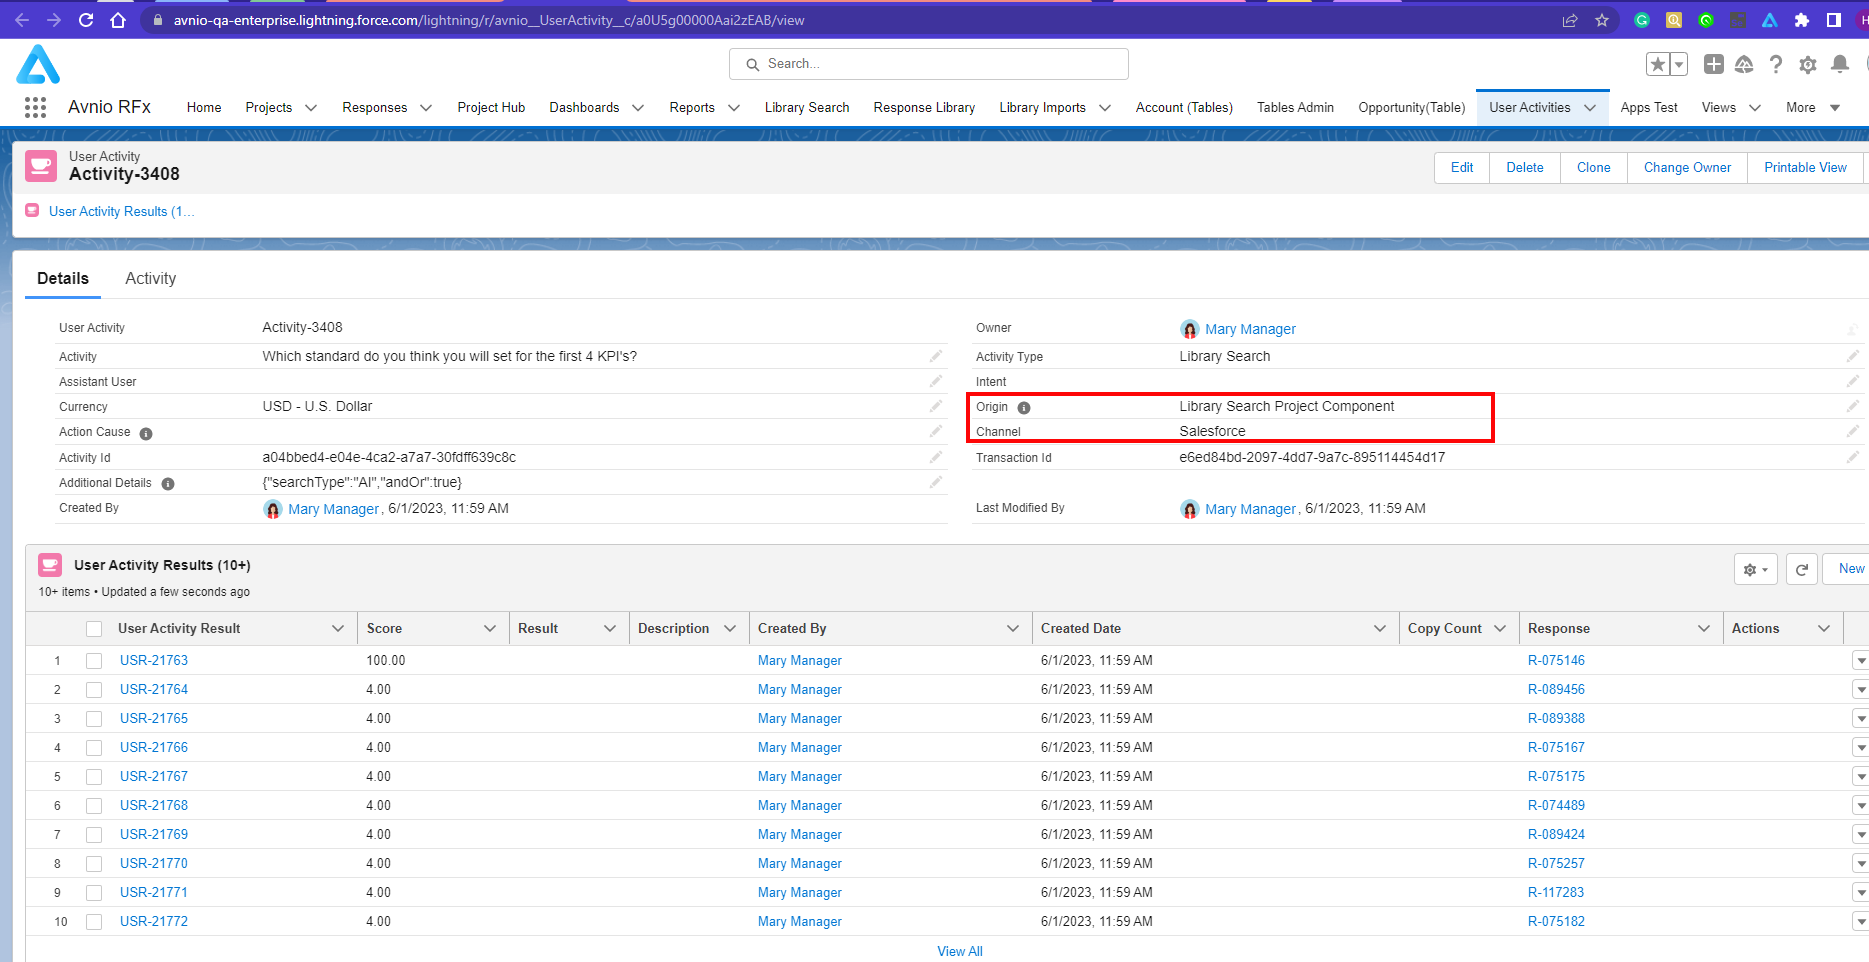 Click to enlarge |
Salesforce - LibrarySync page Library Search | Library Search Library Sync Component | Salesforce | 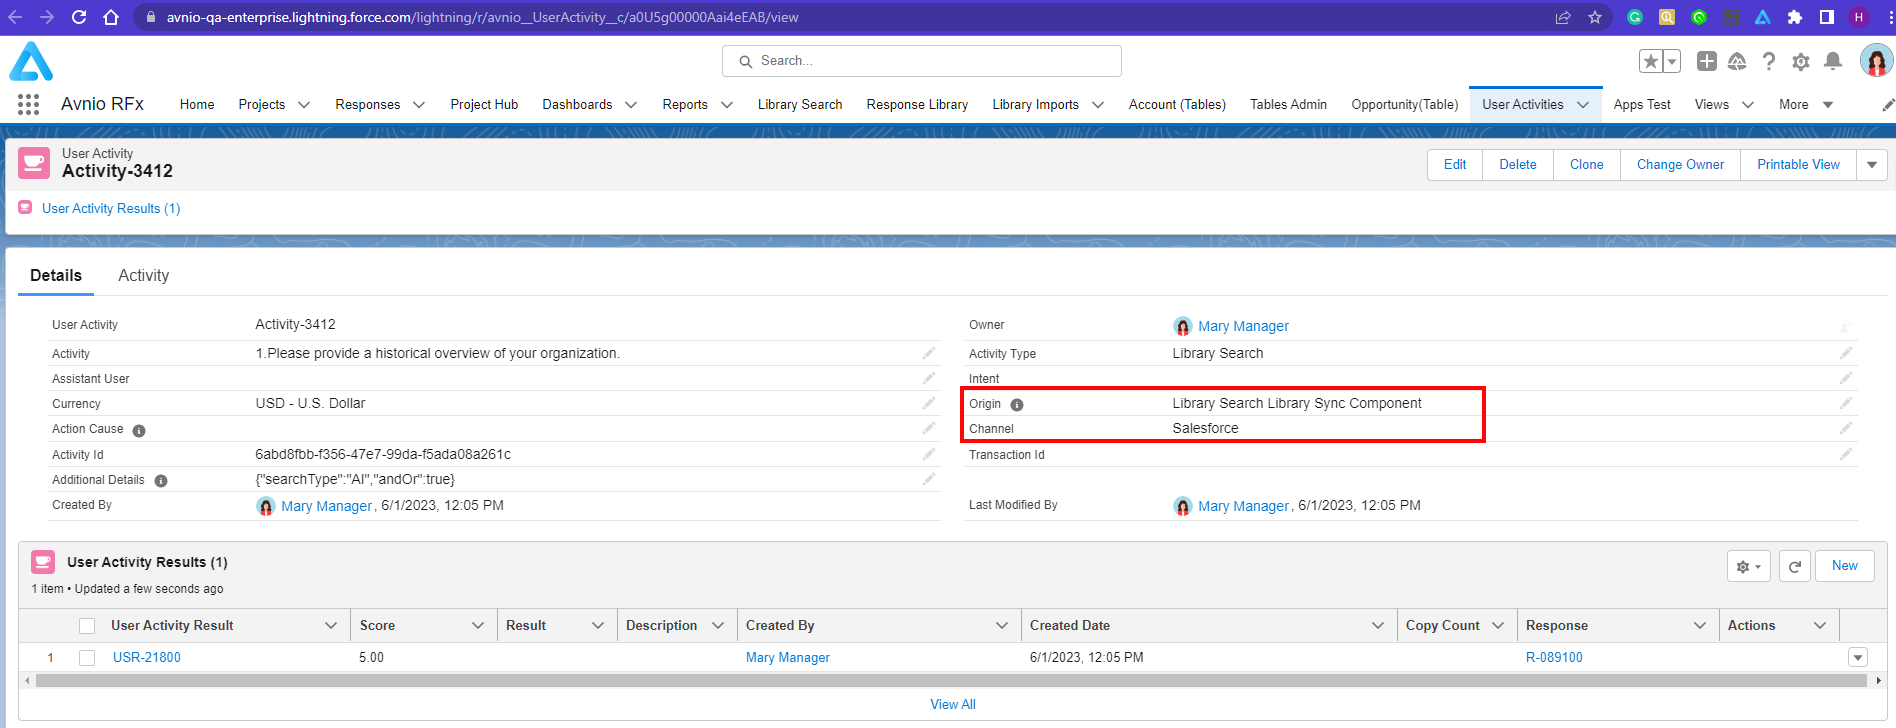 Click to enlarge |
Microsoft Office | Library Search from “Word/Excel/Powerpoint“ Addin | Microsoft Addin | 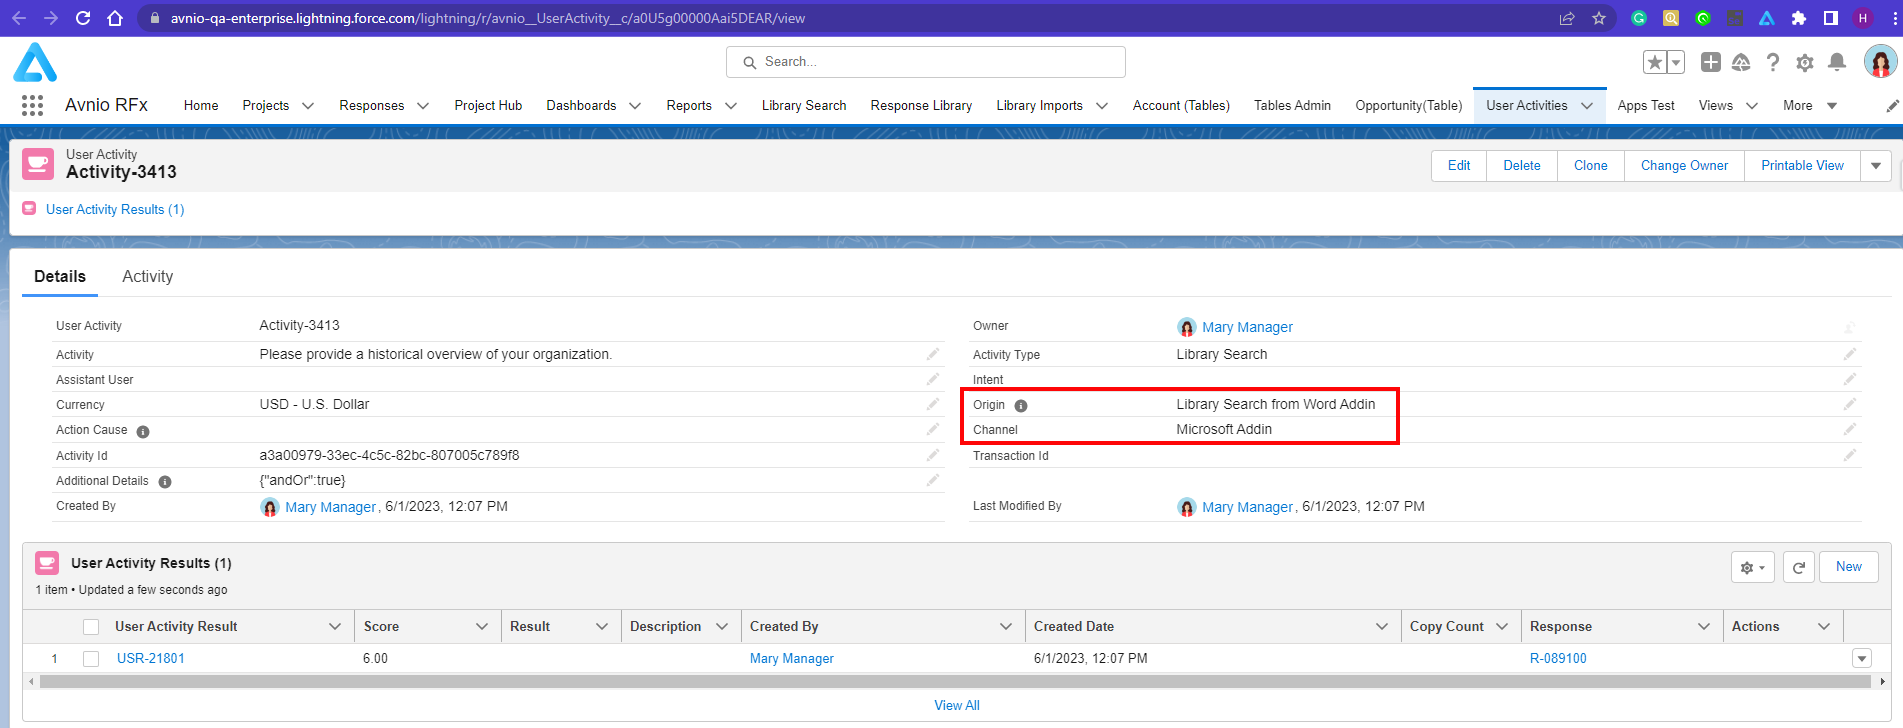 Click to enlarge |
Chrome Extension | Library Search from “chrome;Windows” extension | Chrome Extension | 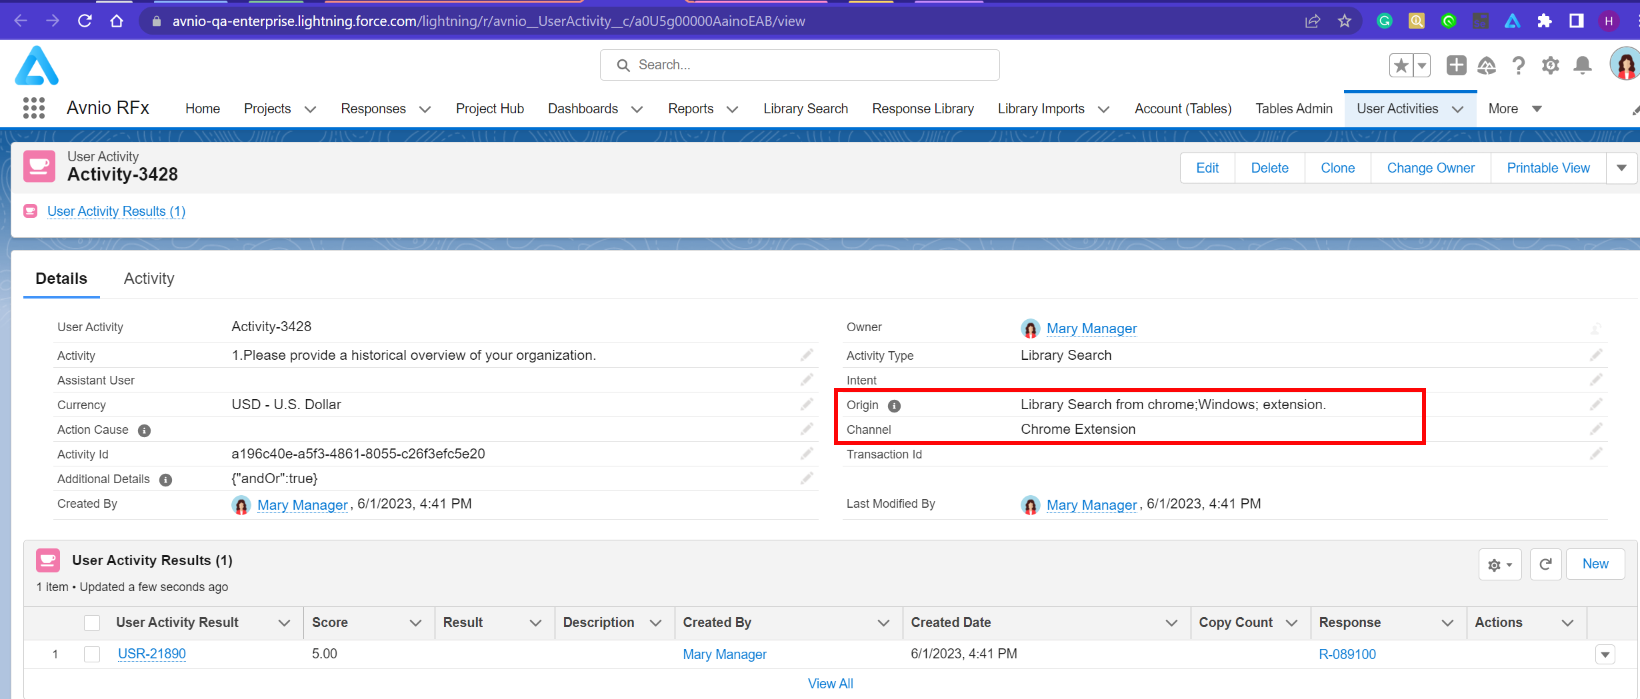 Click to enlarge |
Avnio Assistant | Slack/MS Teams | Avnio Assistant | 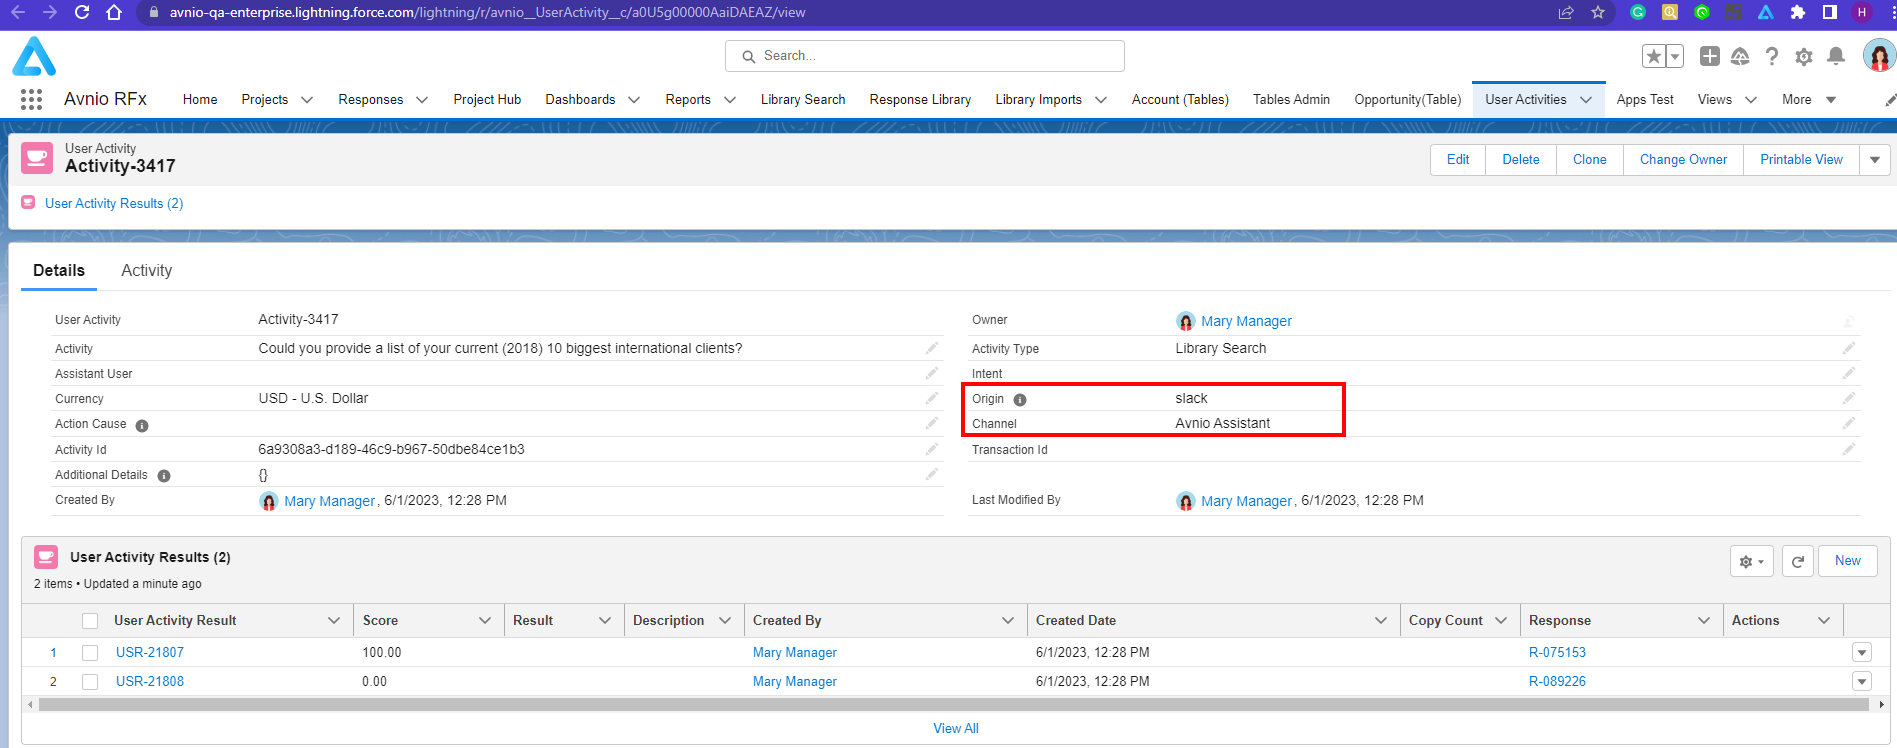 Click to enlarge |
What’s Fixed
The following issues are fixed in this release:
The system will no longer import the parentheses (bracket) symbol prefix available with number and alphabet (for example: 1), a), etc.) for each question and/or category when the user disables the Import prefix for Category and Import prefix for Question settings.
Even if project questions contain numbered prefixes, the system will not display any prefixes to the project question list when sending an assignment email.
The system will not display any error message if a large size file is used while generating a file in the project.
When a non project team member tries to retrieve answer in a project, the system will display a warning message “Since you are not a part of the project team, you will be unable to retrieve the answers. Please request inclusion on the project team from the project owner“ and disable the Retrieve button to restrict the user from performing retrieve action.
When searching for a response in Project Library on the View Question page, if the question has a prefix, the system will now ignore the prefix value defined under Custom Metadata Types > Avnio RFx Configuration > Library Search Pattern and return the result based on the rest of the question text.
Users can now publish the Library Sync Request after adding and removing tags. Previously, users had issues while publishing the Library Sync Request after adding and removing tags.
Known Issues and Limitations
The following are known issues and limitations up to this release: